
Week 1 CSA Newsletter 2020
CSA Newsletter Week 1
June 22-27, 2020 | “A” Week
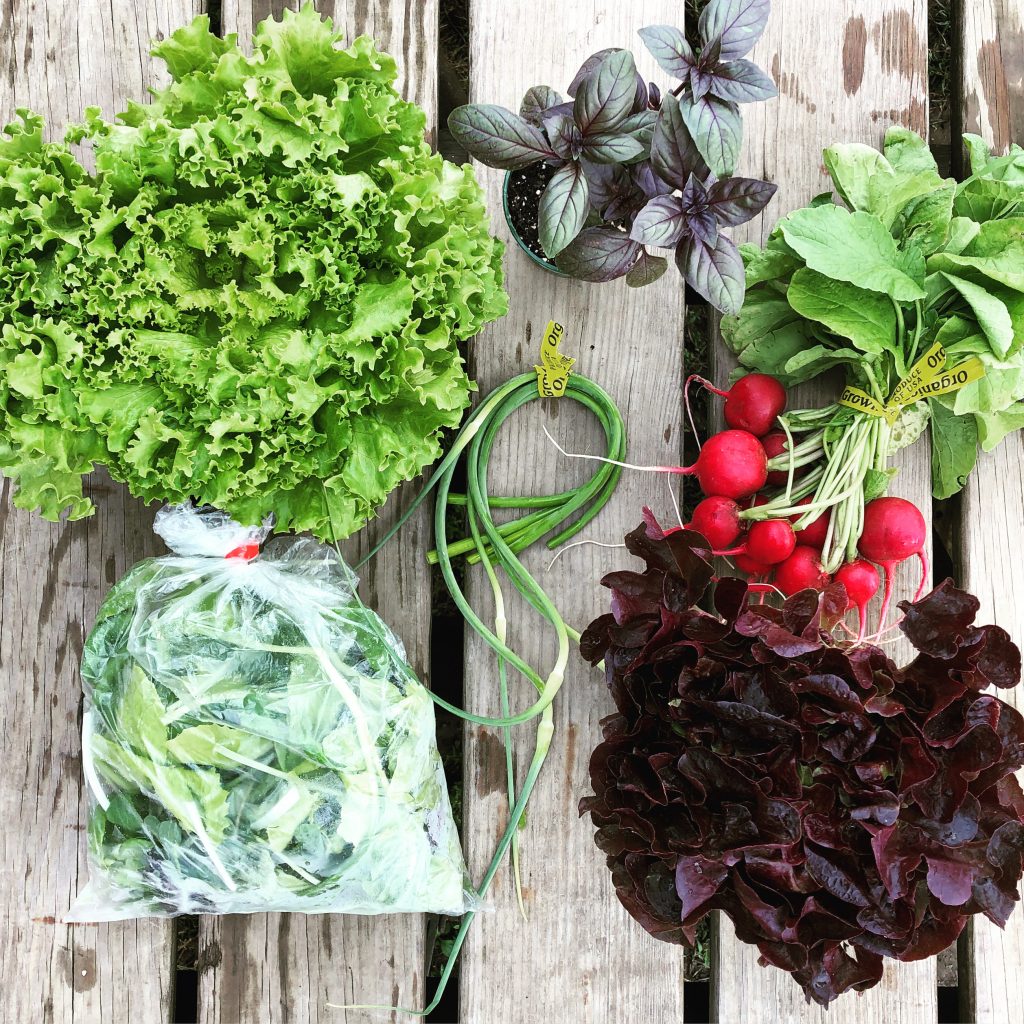
HEAD LETTUCE (2 HEADS) ~ I wouldn’t rinse this until you’re ready to use it. In the meantime, put your head lettuce in a Debbie Meyer Green bag or Tupperware FridgeSmart container right away and leave it in the fridge. Use within a week, although if stored properly, our lettuce will last up to 4 weeks. Lettuce technically falls into the category of “danger zone veggies” — ie they have a short shelf life. So use your lettuce early on in the week for maximum efficiency.
MILD & WILD CUT LETTUCE (1/2 pound) ~ You are going to LOVE this flavor variety! Plus it’s so beautiful! Store this in a Debbie Meyer Green bag or Tupperware FridgeSmart container right away and leave it in the fridge. I wouldn’t wash this until you’re ready to use it. Use within a week.
GARLIC SCAPES (1 bunch of 5) ~ These are the curlicue curiosities in your box. Store them in a Debbie Meyer green bag (or plastic bag) in your crisper. They’ll last about 2-3 weeks. Pull them out one at a time to use. You can trim off the bottom inch of the scape (if it’s woody) as well as the flowering tip (although that is also edible if you want to try it). Grill them whole with some olive oil and salt/pepper. Or chop them up finely as a garlic substitute. You can also chop these and freeze them in a Mason jar or Ziplock bag, and use them all summer/winter as needed.
RADISHES (WITH GREENS) ~ Remove radish leaves if they are still attached. Store the unwashed greens in a loosely wrapped Debbie Meyer plastic bag in the crisper bin of your refrigerator and eat them ASAP. (Add them to scrambled eggs). Store the red radish roots dry and unwashed in a plastic bag in the refrigerator for 1 week. I like to slice and sprinkle them with a little salt and just eat them raw! They’re also amazing when pickled. Or try them roasted on a sheet pan with potatoes and carrots. (They taste almost like potatoes).
POTTED HERB (PICK YOUR OWN) ~ At the pick-up site, you’ll be given a chance to “pick your own” potted herb. Standard size boxes get one herb. Large boxes get to choose 2. If you want them to produce for you all summer, I would either re-pot these herbs into a larger pot when you get home OR plant them into your garden. Don’t just leave them in the pot they came in forever — or they’ll never grow very big. Place them in the sun. Water them once a week or as needed. These herbs come from Mulberry Creek Farms — and they are certified organic.
NOTE: It’s SO important to PRUNE your herbs so that they “bush out” and get bigger. Pruning means you cut or pinch off the top 2-3 inches once it gets “too big.” This will stimulate more growth at the cut-point. You’ll need to do this a few times this summer to keep the plant growing. Also be on the lookout for flowers; you want to pinch them off as they form. To see how you prune an herb, watch my video.
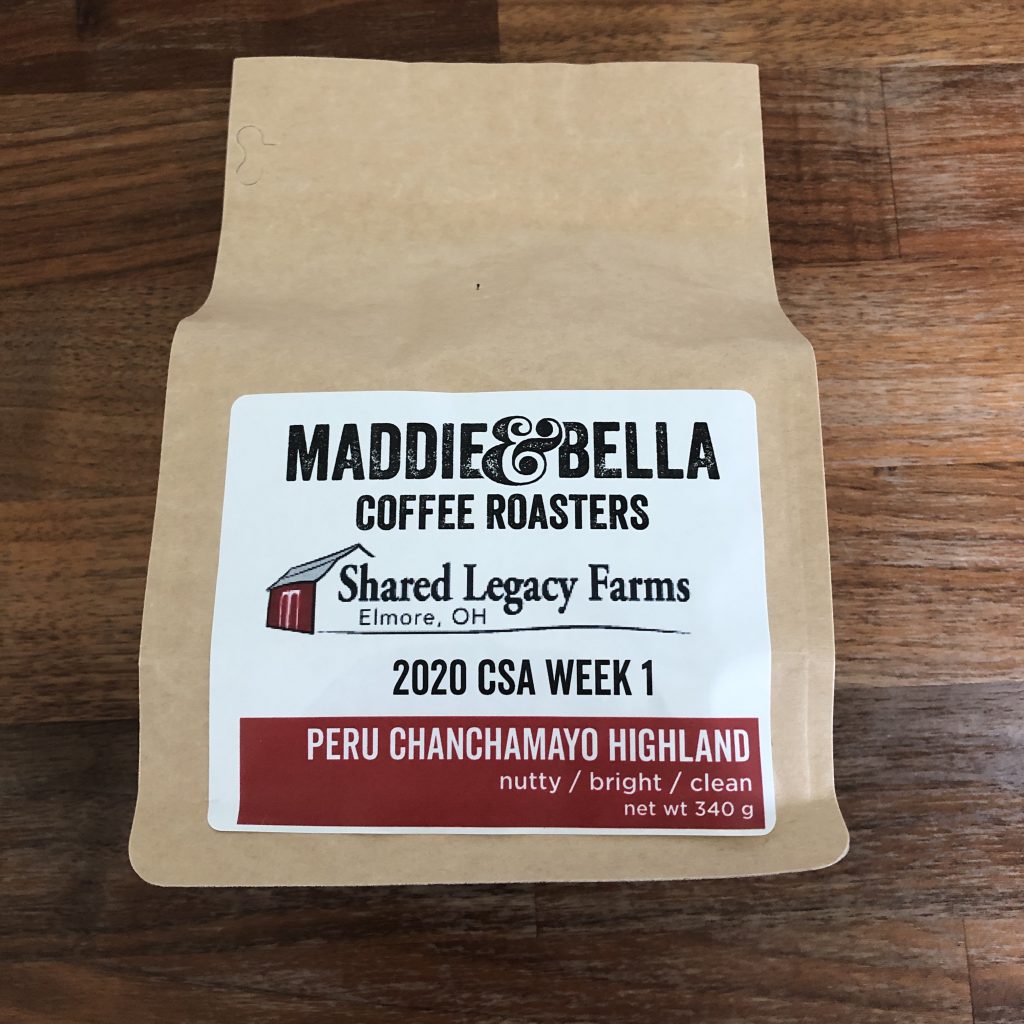
Here is this week’s coffee! Every week M&B gives us a unique bean that you can’t find in their regular stores.
FRUIT SHARE
The Fruit Share will begin on week 2 with “B week” customers.
CHEESE SHARE
Goat Cheese variety: Peppercorn chevre (TurkeyFootCreek Creamery)
Hard Cheese varieties: Wabash Erie Canal, mmBossie Cheddar (Canal Junction Farmstead)
MADDIE & BELLA COFFEE SHARE
Peru Chanchamayo Highland — nutty/bright/clean — sourced exclusively for our CSA
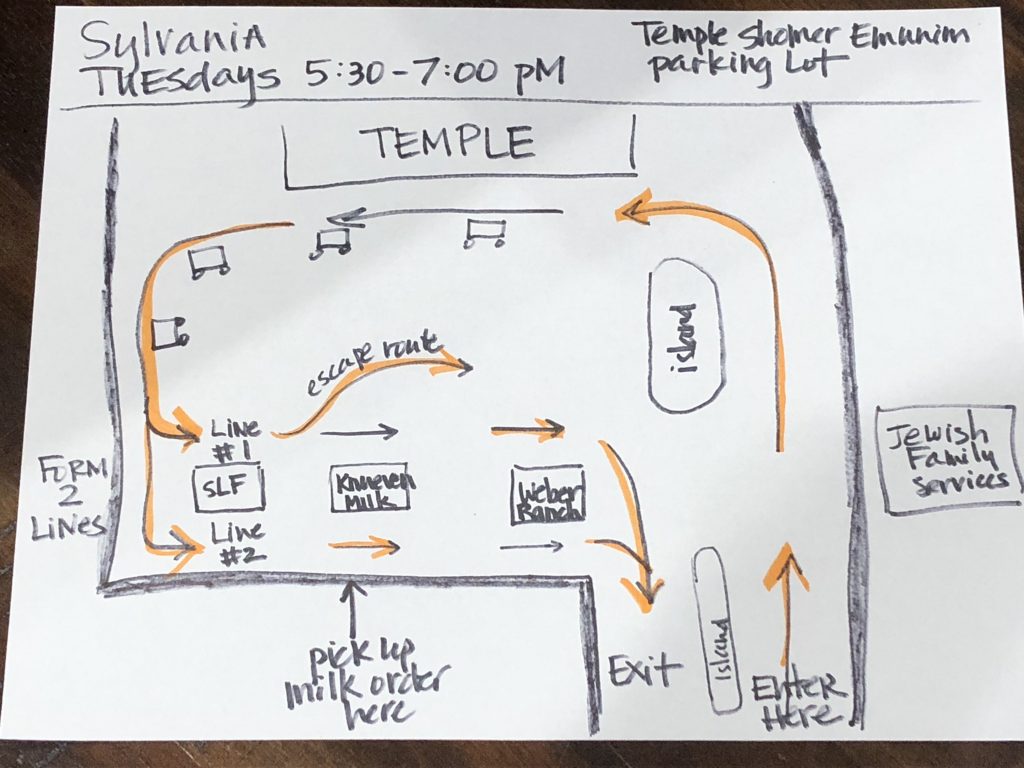
This is the diagram for the Sylvania pickup site
HOW TO PICK UP YOUR SHARE DURING COVID
All pickups will be drive-thru style except Toledo Market. Do not get out of your cars.
- Follow the flow of traffic until you get to the site staff host at the tent/truck. For Perrysburg and Sylvania, you will be able to form TWO identical lines on either side of the tent. Do not leave your vehicle. Hold up a sign in your car window with your customer name on it. Pop your trunk (or roll down your window and tell us where you want us to put your bin). Make sure your veggie bin from the last week is in the trunk (starting week 2).
- Staff host will remove your bin from the prior week from your vehicle. Please return all Weber Ranch egg cartons and veggie totes each week.
- The staff host will give you your share(s) using their checklist – this could include vegetable, fruit, coffee, cheese, or an egg share. (Cheese is delivered every other week on the odd weeks of the season). Don’t worry: extras from the “extras table” will be pre-packed into the box this year.
- Staff will add any additional online store orders you may have purchased in advance from Shared Legacy Farms store.
- Perrysburg and Sylvania: Drive to the Knueven Creamery station and pick up your milk share order or any store order you placed the week prior at www.KnuevenCreamy.com. (Elmore customers will get their milk share and /or dairy store orders from Corinna and her team.)
- Wave vigorously and exit the parking lot. We encourage you to turn RIGHT out of the busy parking lots to keep the exit line from getting too backed up.
To help you out, I have created video demos and diagrams for how to move through each the big pickup sites. Click on your site’s instruction diagram or video link below.
Elmore Pickup (Tuesdays, 5:30-7 PM)
Sylvania Pickup (Tuesdays, 5:30-7 PM)
Perrysburg Pickup (Thursdays, 5-7 PM)
Port Clinton Pickup (Thursdays, 6-6:30 PM)
Toledo Farmer’s Market Pickup (Saturday, 8:30-10 AM) — Find us around booth 151

Farmer Kurt plants celery root this Saturday.
FARMER KURT’S FIELD NOTES
Well howdy everyone! And welcome to WEEK 1!!!
So you may be wondering how things are doing at the farm these days. That’s what this weekly section of the newsletter is all about. Sometimes I write it. Sometimes my wife does (using my voice). See if you can guess who it is each week…
I’m here to tell you it’s dang hot out here!
I was planting celeriac this Saturday (see that picture above), and man if I didn’t sweat out 2 liters of water. I always wear a long-sleeve shirt and neck wrap to protect my arms from sunburn. It actually keeps me cooler too, believe it or not.

Kurt and Zach lay irrigation pipe from the well to our fields.
This week I spent quite a lot of time getting the irrigation set up. Now that we’re seeing ninety-degree days, I’ve got to have my water lines ready to turn on at a moment’s notice. We get our water from my dad’s 300 foot well next door. If you recall, last year we replaced the well pump and piping in a major capital investment. My Mom and Dad purchased a used generator which we installed 2 weeks ago, and it’s ready to rock and roll. Zach and I laid out the long aluminum pipes across the acreage between the well and our farm. Each section needs to fit together like a puzzle to carry the water to our fields. Josiah helped drive the tractor section by section. I still have more work to do to lay the “firehose” down every field block, but we’re getting closer.
My boys have been putting in 4 hour work days almost every day — weeding, driving tractors, planting, moving plants, moving the chickens. They complain about it — don’t get me wrong. But Corinna and I are adamant about teaching them how to work hard. Still, every time they get a free minute, they run into the cooler and lie down on the floor or they stand in front of the window AC unit in the house while watching Hogan’s Heroes DVDs.
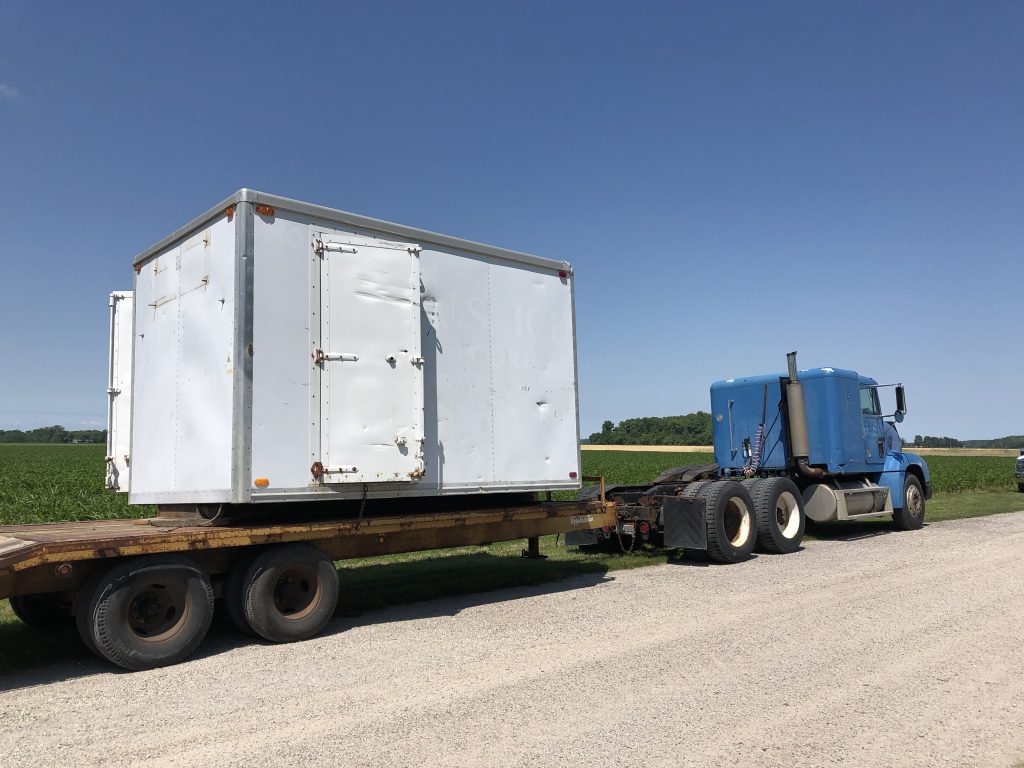
We bought an icebox cooler. This was placed next to our garage for Elmore pickups.
NEW COOLER ~ I bought a new-to-us icebox cooler this past week. With COVID forcing us to create a drive-thru pickup process, Corinna wanted to have a cooler closer to the turnaround at our place in Elmore. I found a small cooler that will do the trick. We quick leveled some ground, laid down gravel/stone, and popped that box next to the garage. My buddy Nick from Chicago came down again for a long weekend, and he cut out a hole in the box to install an air conditioner unit. We use something called a “CoolBot” that talks to a window AC unit and tricks it into dropping to a lower temperature without freezing up. (Hey, you could get one for your house!) I can get my cooler down to 42 degrees Fahrenheit. It’s way cheaper than a condenser unit.
I picked up herb plants from Mulberry Creek Farms for you all this week. Every year, we pass out herb plants on weeks 1 and 2 of the CSA. It is always great seeing Karen and Mark when we pick up the herb plants. This year they have given us a lot of fun varieties. We’re going to ask you to be patient at the pickup site this week. We’ll have several options posted in our email, and we’ll need you to choose one really quick so we keep the line moving. Write your desired herb on your sign or just tell us through the window when you pickup. If you have a large share, you’ll get to choose 2 potted plants. I also potted up a bunch of starter herb plants into “Mother Plants” in our greenhouse this week. We’ll pull from these Mother Plants later in the summer to give you guys some fun fresh herbs in your boxes.
A flashback of last week at the farm.
We passed our GAP (Good Agricultural Practices) Inspection with a 98/100 score this week. That’s pretty darn incredible. The GAP inspection is similar to the Food Safety Inspection by FSMA, although not quite as intense. I sat across from my inspector for 3 hours, going through meticulous checkboxes and scenarios. We answered things like:
- Show me your written policy when food falls on the ground.
- How do you trace your product back to the source in case of a food-borne illness outbreak? (We had to show him the path forward and backward by 24 hours).
- What’s your process for sanitizing your wash water? When do you inspect your well water?
- What’s your policy for checking the temperature of your coolers?
As if on cue, our dog Sienna walked up to the Pack Shed door, looked inside longingly, and then turned around and walked away — which scored us major points with the inspector for “no animals allowed inside the pack shed.” Anyway, I’m glad that’s behind me! We do a lot of paperwork and processes behind the scenes to make sure your food is kept safe. And our 98% score is proof that we take food safety seriously. Needless to say, our inspector was incredibly impressed and said our farm is not the norm around Ohio.
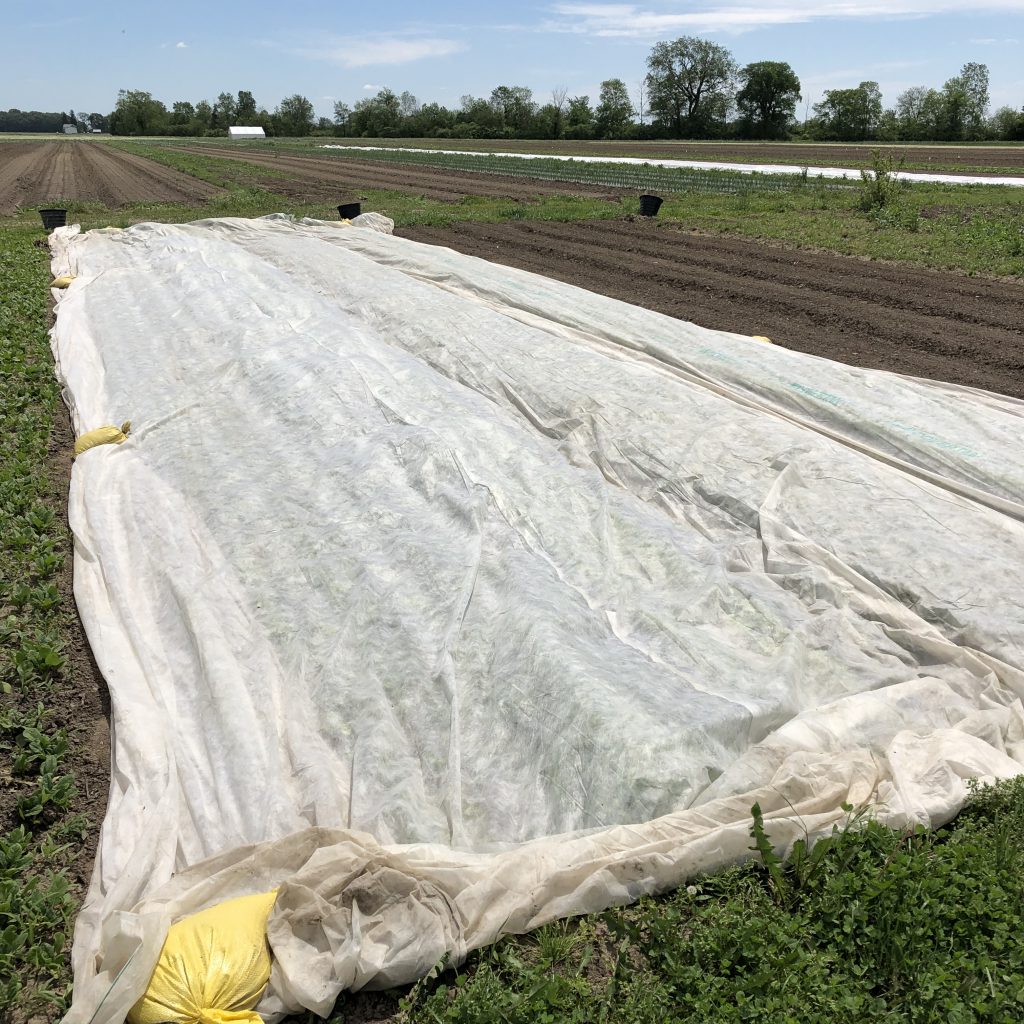
This is row covering called Agribon. It keeps the bugs out if I get it on in time.
As far as the fields go… the crew harvested ALL the garlic scapes this week. We’ll need to harvest the garlic in the next 3-4 weeks and get that curing. The tomatoes are looking great. Eggplant looks strong. Onions are beautiful. My Swiss chard looks amazing — which is a crop that sometimes gives me issues. I lost my spring bok choy to the flea beetles again! #&^%*!!! I’ve decided I’m not going to try and grow that again in the spring. It’s just too darn hot, and either the flea beetles get to it, or the hot temps make it bolt before I can get it to you.
Most of the cucumbers died on me — after we finished planting them we had a lot of wind that broke the stems. We had to re-seed a majority of the varieties. But all in all the farm looks really great and the weeds are somewhat under control. We still consider ourselves very fortunate for being able to do what we do; we serve the best group of CSA customers in Northwest Ohio.
So for those of you seasoned CSA veterans — thank you for your continued support; and for all you rookies, welcome to the family. I can’t wait to see you all this week!
~Your Farmer, Kurt

WEEK 1 ANNOUNCEMENTS
- Don’t forget to bring back your plastic veggie tote on week 2. We’ll sub it out with a fresh one. Simply leave it in your car wherever you want the next bin to be placed by our team. Do not use your veggie box for anything else besides storing our food — don’t let your pets or your kids play in them. Please return any Weber Ranch egg cartons the following week.
- Watch our weekly Live Unboxing video this Tuesday around 8 PM inside the private Facebook group. Cadie Jardin, our CSA coach and dietitian, will show you what’s in the box, share storage tips and ideas for how to use your product. You can find the Facebook group at this link.
- We’ll be passing our pre-ordered farm tshirts at this week’s pickup. If you ordered one, you’ll get it!
- Do you know about the Tupperware party going on for our CSA members? Order before this Sunday night. Once a year, I host a party to sell the Fridgesmarts (those awesome veggie storage containers that keep your produce lasting 4 times as long as normal). They are on crazy sale right now. I recommend getting the medium, large, and extra large Fridgesmarts. I find that their “best use” is for keeping greens lasting longer — and most greens (like Napa cabbage or kale or lettuce heads) are large, so you need the larger totes. The party closes on Sunday evening, June 21st. You can order through this link. I’ll be using some of the party rewards to buy free stuff to give away later this season during our CSA Contests and Challenges.
- Do you still have the Knueven Bonus coupon from last fall for a free half gallon of milk or pint ice cream? To redeem the coupon, go to www.Knuevercreamery.com/market to place your online store order. If you choose a half gallon of milk or the pint of ice cream, use the coupon codes we shared in the email to get it for free. If you don’t remember the coupon codes, email me at slfarms2@gmail.com. Enter the CSA pickup site for your location. Pick it up the next week at the Knueven station at your site. Feel free to order dairy items all summer long from their online store. They will be at our drop off sites every week.
- Beginning this week, you can order additional items from the Shared Legacy Farms online store. Our store link is super easy to remember: www.sharedlegacyfarms.com/store ==> grab a DIY microgreen kit, honey, syrup, and bonus veggie items (like an extra bunch of lettuce or carrots that what’s already in your box). Just be sure to select the right pickup site that coincides with your pickup location. If the pickup option is greyed out or not available, it means you missed the window to order. You need to place your order 2 days before your site.
What’s a Garlic Scape?
If you’re new to the CSA, you may be scratching your head at the bunch of curlicue veggies you uncovered in your first CSA box. Don’t panic! These are super easy to use. They’re called “garlic scapes.” And they are the flowering part of the garlic plant. (Yes!! Garlic produces a flower if you let it!)
Let me share the full story… Garlic is planted in the fall around Halloween. If you’re wondering what a garlic seed looks like, it’s the actual garlic clove. Garlic seed is THE most expensive seed we buy. Every year, we try to save some of our own seed by separating the biggest and best cloves from our harvest. We plant the biggest cloves root-end down, spacing them about 4 inches apart, 1 inch deep.
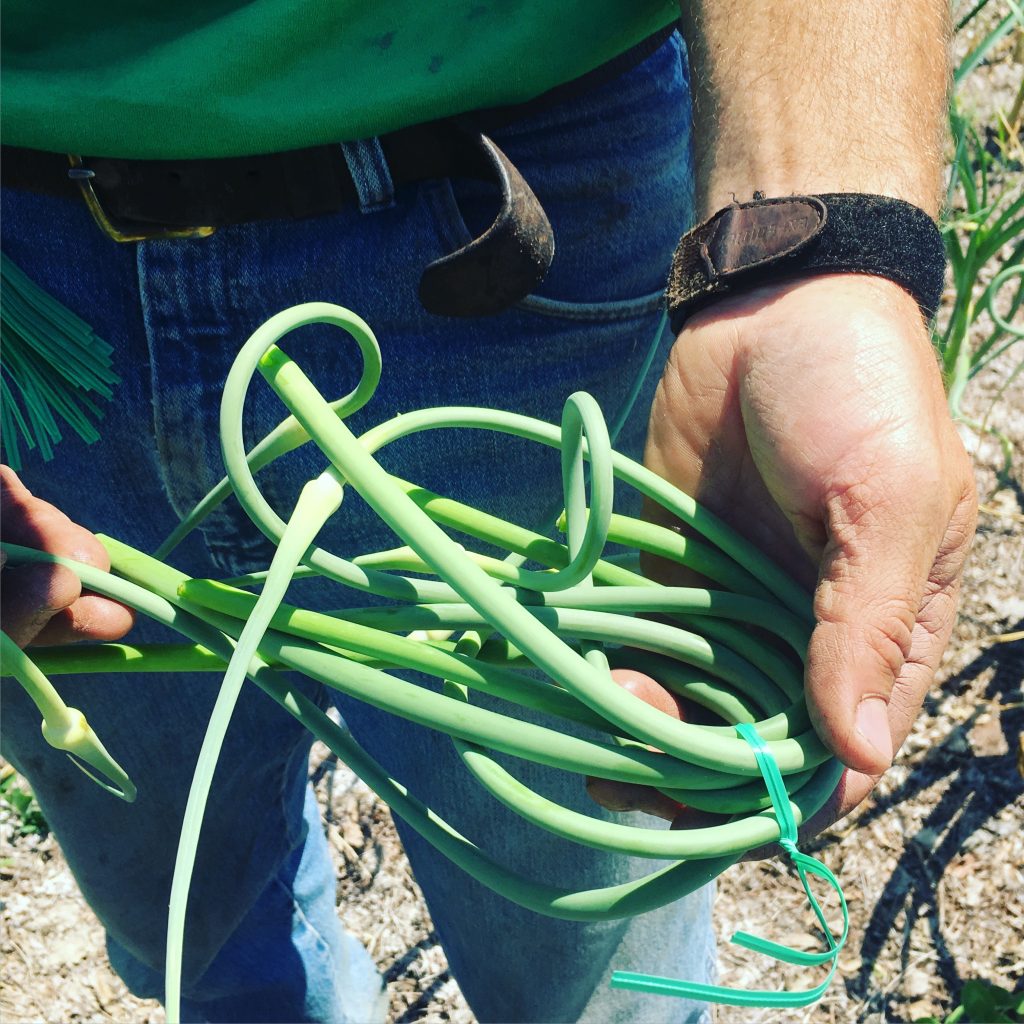
Garlic scapes have a garlic flavor. You can eat the flower on top too.
Kurt covers it all in a thick leaf mulch around December— a tip he read somewhere which has been very effective at keeping out weeds and bugs (plus it adds nutrients to the soil). The garlic grows roots during the winter. In the spring, green tops shoot out — they almost look like green onions or leek plants at first. The plants get very tall, and eventually (right around early June) a curling garlic “scape” forms, which is the flower part of the plant.
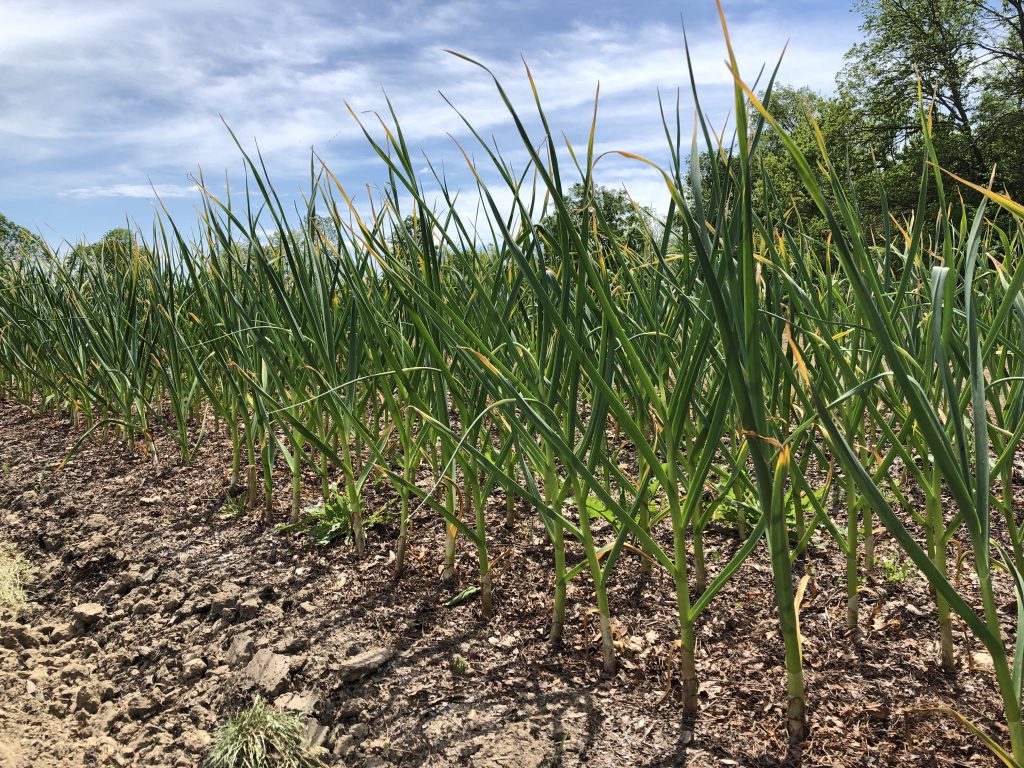
The garlic plant in early June.
We must snip off the scapes, because it makes the bulbs bigger when we do. (The plant is directing its resources and energy to flower formation, so we want to encourage it use that energy to grow bigger bulbs under the ground instead). Turns out you can actually eat the scape too! These scapes are delicious, and taste like a cross between garlic and a scallion. (You can chop them up and use them like garlic in cooking. Or toss them with olive oil, grill them, then sprinkle with salt. Watch your party guests be amazed as they wonder, “What is this thing I’m eating?”).
We know the garlic plant is ready to harvest when the foliage has died off. (We also leave a few scapes attached to act as “indicator plants.” When the curling scape stands up straight and starts to flower, we know it’s time to pull the actual garlic plant — usually in early July).
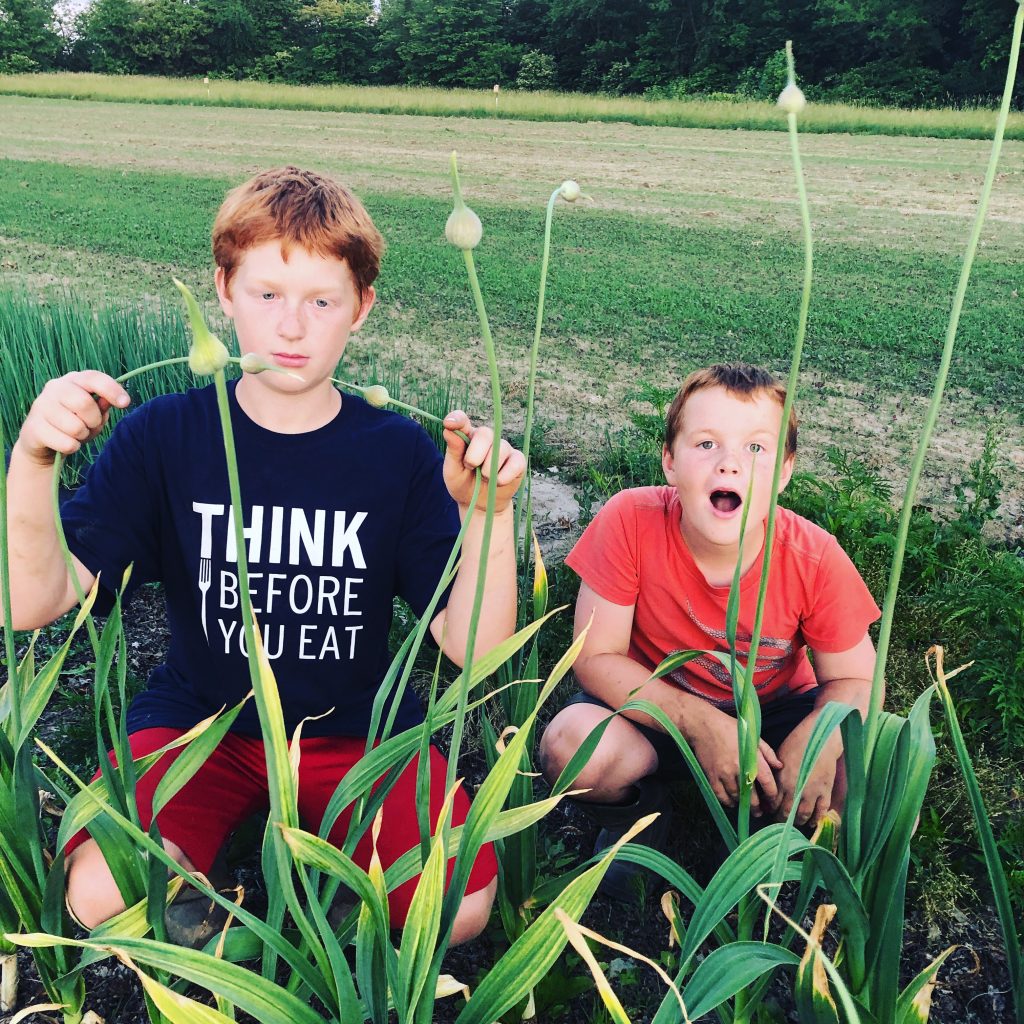
The boys show how the garlic scapes are flowering. This is a sign that the garlic is ready to harvest soon.
In a few weeks, we will begin the giant task of digging out the garlic bulbs. We’ll be sure to document that process when it happens. The plants are pulled, the dirt knocked off and laid onto a giant trailer. Some of this garlic can be sold as “fresh” garlic. It has to be refrigerated and eaten within a week or two. To cure the rest of the garlic for long-term storage, we lay the stalks with their bulbs still attached on the greenhouse tables to “cure” for several weeks. This turns the skins papery thin and white. We’ll then cut the stalks off one by one, cut off the rootlets, and clean up any dirt still on the skin, sort the bulbs by size, and then prepare them for CSA or sale at market or for seed saving.
A little bit of history: In 2019, we suffered a 90% garlic crop failure, which was a devastating blow for us. We had been cultivating a strong (and mighty) seed stock for 5 years, and lost our strongest plants in the freeze. Thankfully we received an insurance claim that helped cover the cost of our seed (which is super expensive) — but not in time for us to order it last fall. As a result, our garlic crop is still fairly small in volume. We are starting from scratch this season, and will be using some of the garlic bulbs for seed storage for next year.
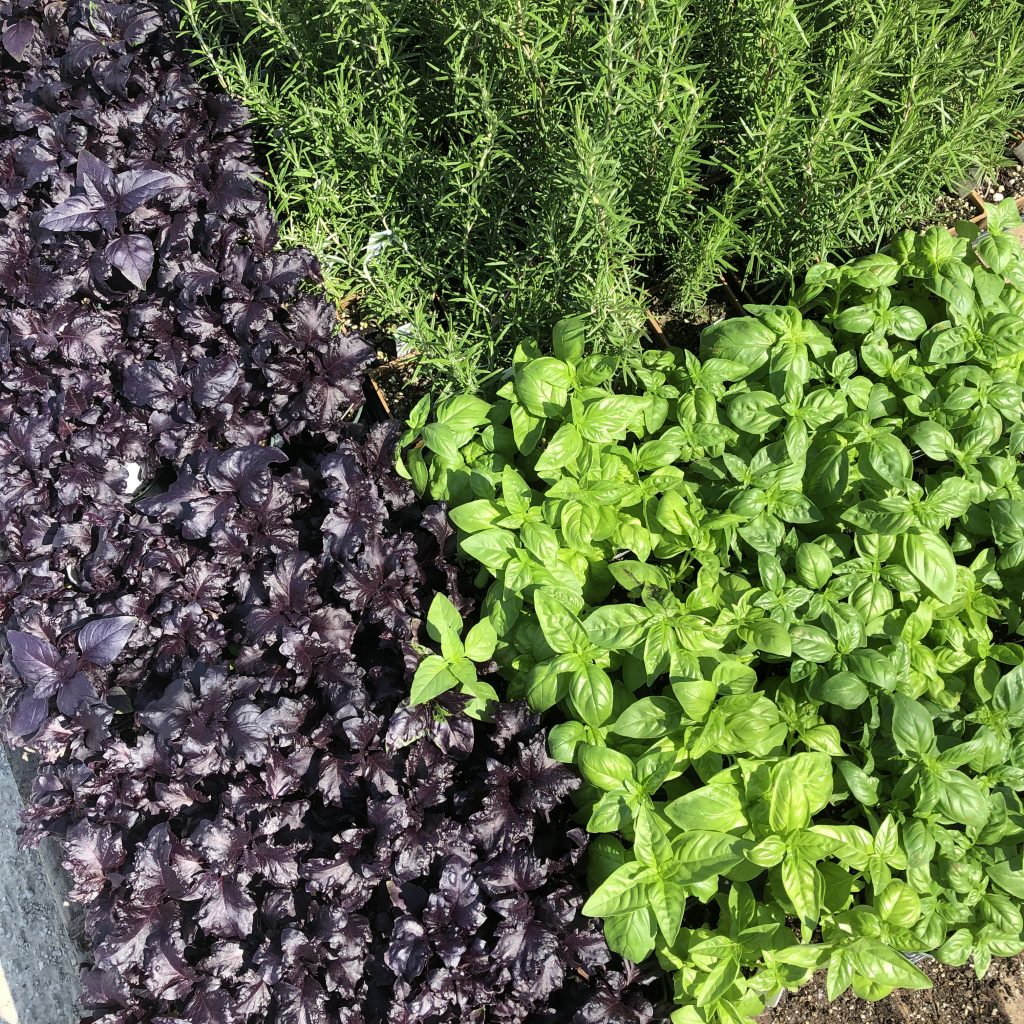
You’ll get to choose one potted herb at your pickup site. Be ready with your wish list!
WEEK 1 CSA RECIPES
Members: You can download these recipes as a PDF inside the Membership Academy.If you aren’t a member of this year, email Corinna at slfarms2@gmail.com — your entry is free as a CSA member.
Steak Tacos with Cilantro Radish Salsa
Adapted from Bon Appetit (www.bonappetit.com) | Total Time ~20 minutes
Love the idea of combining radishes into a salsa! Gives those tacos the perfect crunch!
Ingredients:
2 Tbs oil, divided
1 pound skirt or flank steak
Kosher salt and freshly ground black pepper
½ cup fresh cilantro leaves with tender stems, divided
4 radishes, trimmed, chopped
2 spring onions or 4 scallions, white and pale-green parts only, thinly sliced
½ serrano chile or jalapeño, seeds removed if desired, finely chopped
2 Tbs fresh lime juice
8 corn tortillas, warmed
2 oz queso fresco or Cotija cheese, crumbled
Directions:
Heat 1 Tbs oil in a large skillet over high heat. Season steak with salt and pepper and cook about 5 minutes per side for medium-rare. Let steak rest 5 minutes.
Meanwhile, chop half of cilantro and toss with radishes, onions, chile, lime juice, and remaining 1 Tbsp. oil in a medium bowl. Season radish salsa with salt and pepper.
Slice steak and serve on tortillas topped with radish salsa, queso fresco, and remaining cilantro.
Roasted Radishes with Brown Butter, Lemon and Radish Tops
Adapted from Epicurious (www.epicurious.com) | Total Time ~35 minutes | Serves 4
If you’re nervous about radishes, roast them! This is a great recipe that also incorporates the GREENS!
Ingredients:
1-2 bunches radishes
1 ½ Tb EVOO
Coarse Salt
2 Tbs unsalted butter
1 tsp fresh lemon juice
Directions:
Preheat oven to 450 degrees.
Brush large heavy-duty rimmed baking sheet with olive oil.
Cut off all but 1/2 inch of green radish tops; reserve trimmed tops and rinse them well, checking for grit.
Coarsely chop radish tops and set aside. Cut radishes lengthwise in half and place in medium bowl. Add 1 1/2 tablespoons olive oil and toss thoroughly to coat.
Place radishes, cut side down, on prepared baking sheet; sprinkle lightly with coarse salt. Roast until radishes are crisp-tender, stirring occasionally, about 18 minutes.
Season to taste with more coarse kosher salt, if desired.
Melt butter in heavy small skillet over medium-high heat. Add pinch of coarse kosher salt to skillet and cook until butter browns, swirling skillet frequently to keep butter solids from burning, about 3 minutes.
Remove skillet from heat and stir in fresh lemon juice.
Transfer roasted radishes to warmed shallow serving bowl and drizzle brown butter over. Sprinkle with chopped radish tops and serve.
Garlic Roasted Radishes
Adapted from The Real Food RDs (www.therealfoodrds.com) | Total time ~25 minutes | Serves 4
Roasted radishes are amazing! They become more “potato like” when cooked!
Ingredients:
4 cups radishes, trimmed and halved (~3 cups halved)
4 garlic cloves, minced (sub in garlic scapes)
2 T butter or ghee, melted
½ tsp sea salt
¼ tsp pepper
Optional fresh parsley, dill or chives
Directions:
Preheat oven to 400 degrees. Line baking sheet with foil and set aside.
In a bowl combine all of the ingredients and toss until radishes are evenly coated with the melted butter or ghee.
Place radishes cut side down on baking sheet.
Bake for 14-16 minutes or until slightly golden brown.
Garnish with parsley, dill or chives and serve.
Garlic Scape Hummus
Adapted from Abundant Harvest Kitchen (www.abundantharvestkitchen.com) | Total time ~10 minutes
Do this! It’s an amazing dip for vegetables or crackers, it can also be used as a sandwich spread. You can also freeze hummus if you’re using this as an exit strategy.
Ingredients:
5-7 garlic scapes, cut into large pieces (~1 inch)
2 cups cooked garbanzo beans, drained if using canned (can also substitute white cannellini beans)
juice from one lemon
½ olive oil
sea salt and pepper to taste
Directions:
Combine garlic scapes, beans and lemon juice in a food processor. Blend well.
Add olive oil and continue to blend. Add salt and pepper to taste.
Store in refrigerator for 1 week, or in the freezer for several months.
White Bean & Garlic Scape Dip
Adapted from Just a little bit of Bacon (www.justalittlebitofbacon.com) | Total Time ~10 minutes
Garlic scapes have quickly gained popularity in the CSA community. Try them out in a dip to use on top of your other veggies this week. Very similar to the hummus above!
Ingredients:
1 cup garlic scapes
2 15-ounce cans white cannellini beans, drained and rinsed
¼ cup EVOO
¼ cup water
¼ cup parsley, chopped
salt and pepper to taste
Directions:
Bring a large pot of water to a boil and set out a bowl of ice water. Add the garlic scapes to the pot and boil for 30 seconds. Drain and plunge the scapes into the ice water.
Roughly chop most of the scapes and finely chop a few for topping the dip.
Add the garlic scapes, white beans, olive oil, water, and parsley to a food processor (or blender) and process until smooth.
Add more water if it’s too thick. Taste the dip and add salt and pepper to taste. Serve topped with some garlic scapes, chopped parsley, and a drizzle of extra virgin olive oil.
Garlic Scape Pesto
Adapted from A Dish of Daily Life (www.adishofdailylife.com)
Pesto is not just for pasta! Use it on other salads, roasted vegetables, sandwiches and more. You can freeze for use all year long!
Ingredients:
2 cups basil, packed
1 cup garlic scapes, chopped
1 cup slivered almonds
¾ cup EVOO
juice from one lemon
1 cup Parmesan cheese
salt and pepper to taste
Directions:
Process garlic scapes in food processor.
After they are broken down, add in the slivered almond and basil and continue to process.
Add olive oil and lemon juice in a steady stream, as you continue to blend.
Add parmesan and pulse a couple times to process.
Season to taste with salt
Creamy Herb Dressing
Ingredients:
½ cup sour cream yogurt may be substituted, but the consistency of the dressing may change
¼ cup EVOO
¼ cup chopped fresh herb leaves such as: basil, parsley, dill, marjoram, or oregano
1 Tbs white wine vinegar
1 lemon juiced
1 garlic clove, chopped
½ green onion mainly the white part and some green, about 2-3 tablespoons Note: The green onions add a tangy bite. They may be left out of the recipe for a mild dressing.
Directions:
Add all the ingredients to the bowl of a food processor. Pulse the ingredients for 1 minute or until the dressing is creamy and the herbs are finely chopped.
Store in the fridge for up to 2 weeks.
Kitchen Sink Dressing
Contributed by Shelia Banerji in our CSA group
Ingredients:
3 T Plain Hummus
2 T Balsamic vinegar
3 T Orange juice
1 tsp mustard
½ tsp fresh ginger grated
1 tsp maple syrup
Directions:
Whisk all ingredients together and pour on top.
Brian Hammer’s Ranch Dressing
Contributed by Brian in our CSA group, who claims to “detest bottled salad dressing!” This recipe is a great way to use up some of those fresh herbs!
Ingredients:
Buttermilk
Mayo
Garlic (or garlic scapes)
A bunch of fresh herbs (dill and chives are his favorites, but could also use parsley, cilantro, etc)
Directions:
Most ranch dressings call for about a 1:1 ratio of buttermilk to mayo, but you can play around with the ratio to get the viscosity you want. Throw it all in the blender and “let it whirl” per Brian.
Homemade Italian Dressing
Contributed by Daniel Kuhl from www.thewholecook.com
Ingredients:
¾ cup EVOO
¼ cup red or white wine vinegar
1 tsp garlic powder
1 tsp dried oregano
1 tsp dried basil
½ tsp onion powder
½ tsp crushed red pepper
¾ sea salt
½ tsp pepper
1 tsp lemon juice
Directions:
Add all ingredients to a jar, place the lid on the jar, and give it a good shake!
Just like with all vinegar based dressing you’ll need to shake it up again before pouring to eliminate separation.