
CSA Newsletter Week 2, June 27- July 4, 2020
CSA Newsletter Week 2
June 28 – July 4, 2020 | “B” Week
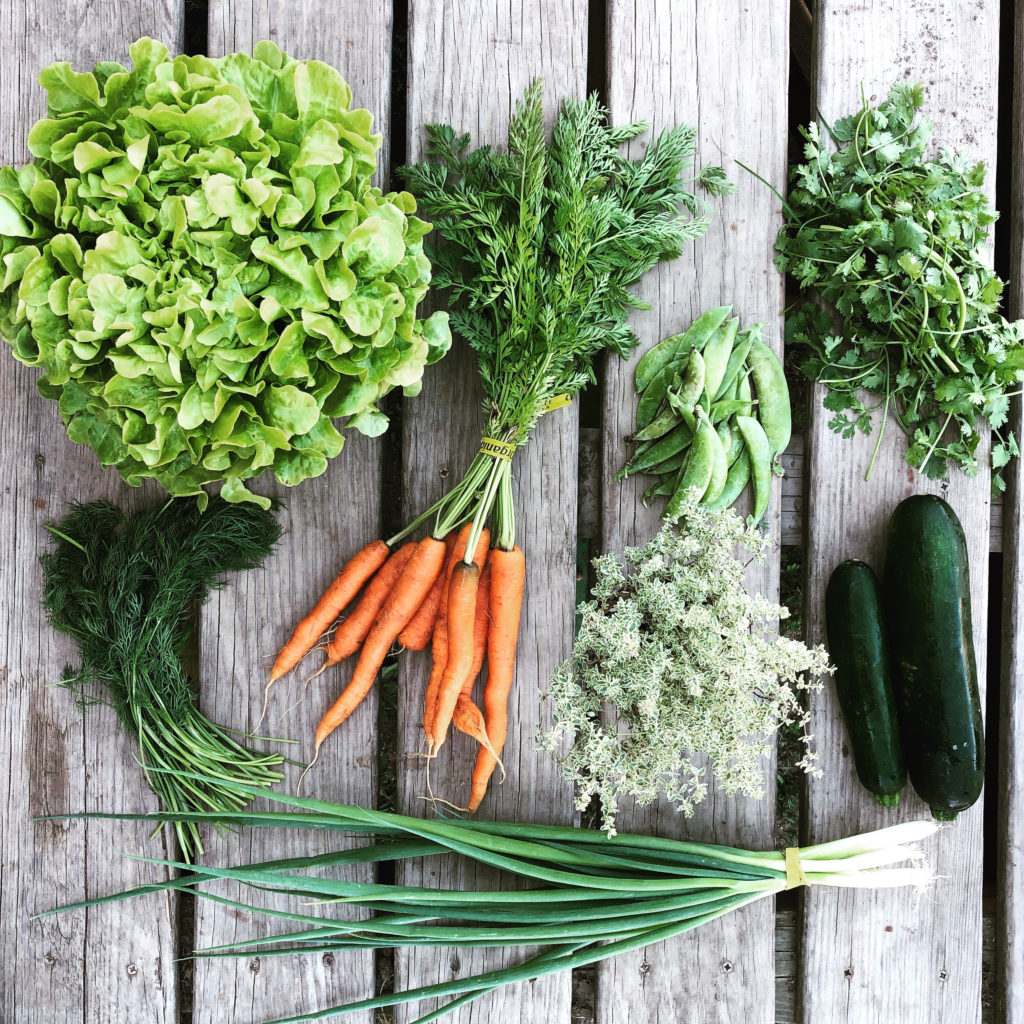
The Week 2 Box
HEAD LETTUCE (1 HEAD) ~ I wouldn’t rinse this until you’re ready to use it. In the meantime, put your head lettuce in a Debbie Meyer Green bag or Tupperware FridgeSmart container right away and leave it in the fridge. Use within a week, although if stored properly, our lettuce will last up to 4 weeks. Lettuce technically falls into the category of “danger zone veggies” — ie they have a short shelf life. So use your lettuce early on in the week for maximum efficiency.
CARROTS (WITH TOPS) ~ Remove tops ASAP. Do not make this common rookie storage mistake. If you fail to remove the tops of the carrots, the root will become soft after a few days. That’s because the greens soak up the moisture from the carrot root. Store the unwashed tops in a loosely wrapped Debbie Meyer plastic bag in the crisper bin of your refrigerator (try carrot top pesto!). Or you can dry them from a string, and use them later as an herb in place of parsley. Store the roots dry and unwashed in a plastic bag in the refrigerator for up to 4 weeks.
GREEN ONIONS ~ I recommend storing this in a Mason jar filled with an inch of water so the roots can “drink.” Then put it in the fridge. Place a Ziploc baggie over the green tops to keep them from drying out. (I’ve also stored them on my countertop this way) If you don’t have room for this way of storing, then just wrap them in a plastic bag and store in the fridge. You can chop off the green tops into one inch segments and throw them in a Ziploc baggie and freeze them. (Use them later in stir fries or soup).
SUMMER SQUASH (3-4 pieces) ~ Try grilling these, zucchini friese, making zucchini boats, sauteing in olive oil, or roasting. To store, place in a Debbie Meyer Green bag and put in the fridge. Try to use it within 6-7 days, as sometimes they can start to mold fast. You’ll get better storage results in the Fridgesmart container. To use: rinse under water to remove the dirt or prickles, and slice off the stem and blossom ends. Then slice or chop. These squash come from our partner farm Mile Creek Farm (also certified organic).
CILANTRO ~ Trim the ends of the cilantro just a bit and place in a jar of water in the fridge with a plastic bag over the top. Cilantro will spoil quickly, so use it within 5 days. Or try storing it in a small Fridgesmart container — it makes them last a lot longer. You can also try just storing it in a plastic baggie in your fridge with a paper towel. Use cilantro within 3-4 days, as it is highly perishable.
POTTED HERB (PICK YOUR OWN) ~ At the pick-up site, you’ll be given a chance to “pick your own” potted herb. Standard size boxes get one herb. Large boxes get to choose 2. If you want them to produce for you all summer, I would either re-pot these herbs into a larger pot when you get home OR plant them into your garden. Don’t just leave them in the pot they came in forever — or they’ll never grow very big. Place them in the sun. Water them once a week or as needed. These herbs come from Mulberry Creek Farms — and they are certified organic.
NOTE: It’s SO important to PRUNE your herbs so that they “bush out” and get bigger. Pruning means you cut or pinch off the top 2-3 inches once it gets “too big.” This will stimulate more growth at the cut-point. You’ll need to do this a few times this summer to keep the plant growing. Also be on the lookout for flowers; you want to pinch them off as they form. To see how you prune an herb, watch my video.
RHUBARB (FRUIT SHARE ONLY) ~ the simple way to store rhubarb is just to wrap it in a plastic bag and store it in the fridge. If you’re going to keep it for a while, you might want to try wrapping it in foil OR cutting it in smaller lengths and letting it sit in some water to keep it crisp. Rhubarb is extremely sour. It is often used in baking in conjunction with sugar. If there are any leaves attached, remove them. Chop into slices like celery.
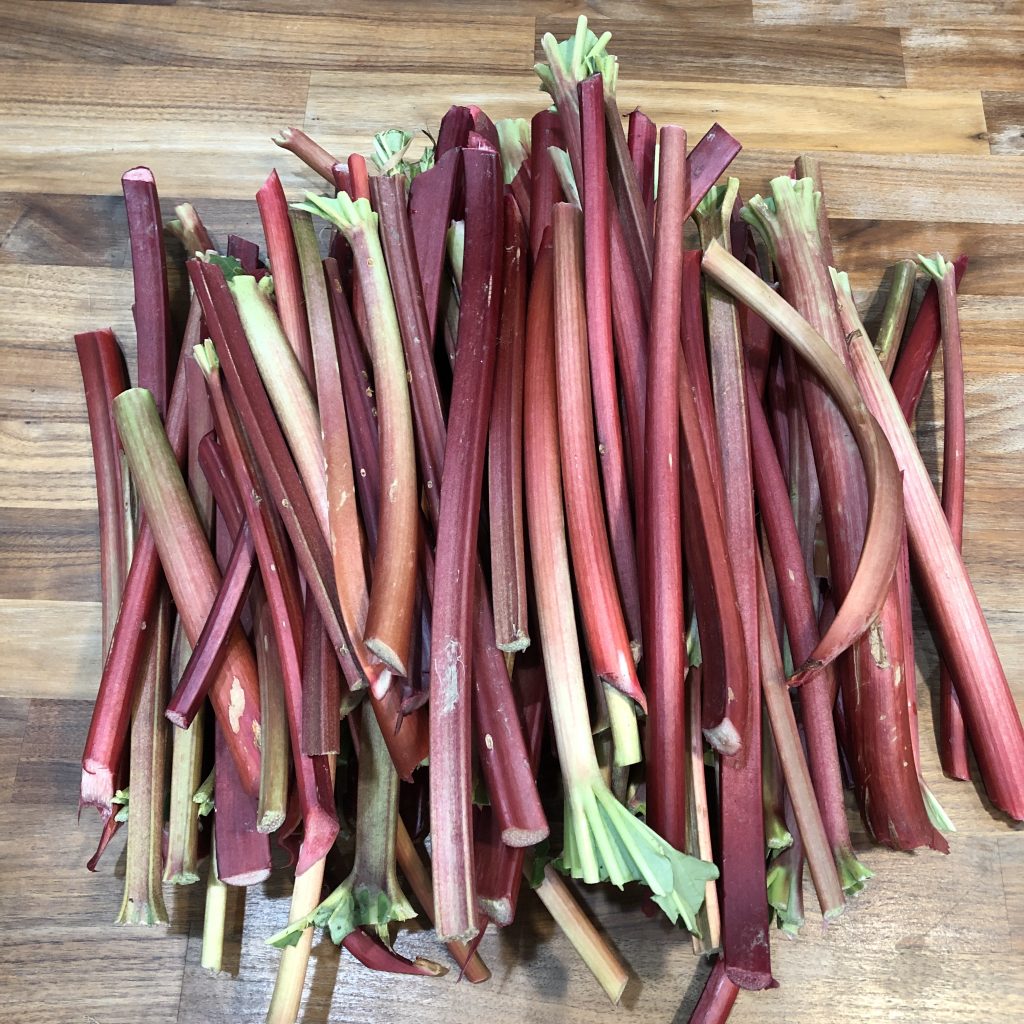
This is what rhubarb looks like. (Kinda like celery, but really sour).
FRUIT SHARE
We begin our fruit share with Week B customers! The fruit share will run for a total of 16 weeks, starting today. That means that on week 17 of our CSA, week A customers will receive the final fruit share.
One pouch of sweet cherries (from Quarry Hill Orchard), Rhubarb (Wayward Seed Farm).
Note: The rhubarb is organic. The cherries are not.
MADDIE & BELLA COFFEE SHARE
Nicaragua Cafe Diego — smooth/creamy/sweet caramel — sourced exclusively for our CSA
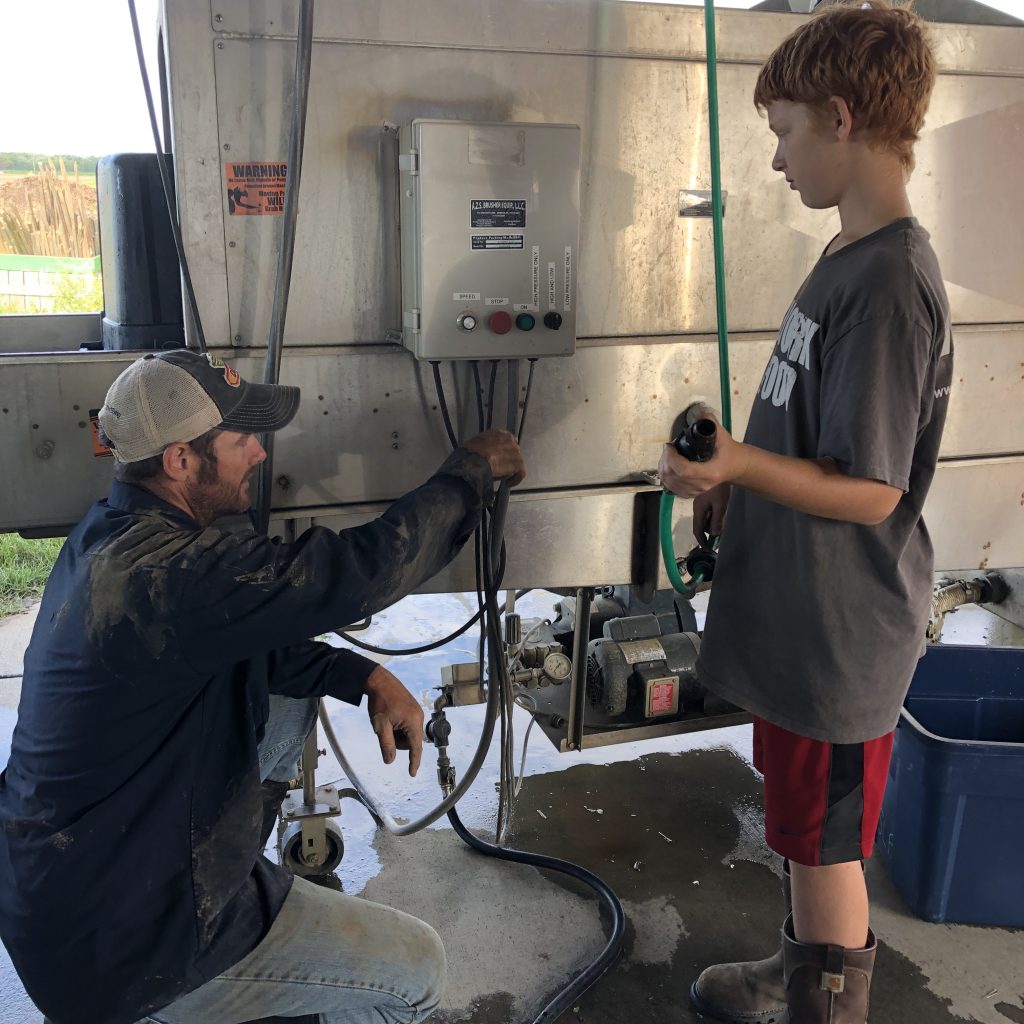
Farmer Kurt schools Jed on how to trouble-shoot and fix the line bin washer.
FARMER KURT’S FIELD NOTES
Welcome to WEEK 2’s CSA farm highlights. First week’s pickup went off with only a handful of glitches and store order snafus. Thank you for being patient as we work out the kinks for round two! I thought the pickup process went really quick — faster than usual. I think this had something to do with all our volunteers. So a big shout-out to everyone who took time to act as a site host this week.
The bin washer died on me this past Monday during pack night. That’s a pretty big deal since we rely on this tool to cool/clean our product. And it’s a major time saver for washing harvest totes and your CSA bins. I was able to call the machine designer (an Amish guy) who walked me through how to bypass a circuit until I got the new part. (I’ve been doing a lot of jury-rigging the last few days as you’ll soon find out.)
I’ve been irrigating quite a bit this past week. We got some much-needed rain this Friday night, which has eased the stress a bit. You may not know this, but I actually manage my parent’s vegetable farm operation next door during the week too. My dad’s sweet corn needs a pretty steady regimen of water, as do his melons. But they are located on opposite sides of the property. Take a look at this picture below again. You can see the irrigation pipe that we have to lay down to channel water from the well (between the trees) to our fields.

Kurt and Zach lay irrigation pipe from the well to our fields.
My dad’s sweet corn is to the left of the well (in this picture), and the melon patch is to the right.
Here’s the issue: we’ve only got so much pipe length. So if my fields (behind the photographer in this picture) need water, I need to take several hours to go and dismantle the pipe by my dad’s melons and then install it so it leads to my stuff. Not to mention, these pipes are 60 years old, and I broke two of them this week.
I had a meeting with my “CFO” (aka Corinna) this week to try and get her approval of a purchase of 50 additional thirty-foot pipe lengths. Priced at $3.75/foot (do the math), she put the kebosh on a full-scale investment (arguing that we need to play it conservative this year with all the COVID financial uncertainty). After giving her puppy dog looks and explaining how this request would save me tons of time and stress, I was able to convince her to meet me halfway, and she released funds for 20 pipe-lengths.
I high-tailed myself back to Ackerman’s to grab those lickity-split. They are now here on the farm, and I was able to lay pipe in 2 out of the three directions. At the simple flip of a valve, I can move water from the well to a different area of the field.
It’s pretty awesome.
COOLER ISSUES ~ The “new to us” cooler is working like a charm. The big silver cooler however is giving us trouble. If you recall, this cooler was expanded a month ago with additional panels, giving us the ability to hold multiple pallets of sweet corn to quickly remove filed heat.

We expanded the silver cooler, adding extra panels.
With the expansion however, our one AC unit/Coolbot is no longer adequate. It works the unit too hard, so I was looking into an alternative way to cool the space. In true farmer fashion, I was hoping to hodge-podge it together with a bunch of parts and a condenser unit from another cooler. I asked my consultant to price out what it would cost to put it all together.
“Ten grand,” was the response I got. Well, that made my jaw drop. So it’s back to the drawing board. My big job this coming week is to find another solution. Corinna suggested buying a second AC unit and Coolbot and cutting another hole in the silver cooler. That may be the route we have to go for the short term. That cooler is our primary cooling unit, so I really need to get it up and running ASAP. Right now we’re trying to store things in the garage cooler and CSA bin cooler — which works — but it’s awkward having to move things in and out all the time to make space.
We staked tomatoes this week. Normally this job seems to happen whenever the temperatures are super-hot. It’s one of the most physically taxing jobs all season. I didn’t get a picture from this year, but here’s a picture of this process taken a few years ago.
We’ll be finishing up that process this week, but most of them are in now. I’ll also be tying the first layer of twine around the stakes to support the tomatoes which are growing nice and strong. You can see a picture of them in the collage image down below.
As far as the fields go… you’re enjoying the first of the carrots this week! My chard looks really good. Sweet corn is starting to tassel. (We are expecting the first corn around July 20). Cucumbers are really the only thing that look a little “eh.” I continue to work on weeding beds. With the hot temps expected this week, I’ll be doing a lot of irrigating, but it’ll be good for our summer plants — especially melons, tomatoes, peppers, and corn.
~Your Farmer, Kurt
Carrots are the featured item in this week’s box.
WEEK 2 ANNOUNCEMENTS
- You guys ACED the pickup process this week! Some of you had some pretty awesome car name signs. To have some fun, we’ve decided to create a CAR NAME SIGN CONTEST for week 2 pickup! Beginning THIS week, Kurt and I will be voting for our top 2 favorite CAR SIGNS that we see over the course of the next 6 days. On Saturday, July 4th, we’ll announce the winners, who will each receive a free 4-pack of Knueven ice cream sandwiches! (Thanks, Knuevens for donating them!) To enter, take a picture of your name sign and post it in the thread in the Facebook group. (If you aren’t in the FB group, you can email it to me at slfarms2@gmail.com) So get the kids, your glue gun, markers, and creative spirit and start bedazzling your car signs! Let’s make ’em good!
- Don’t forget to bring back your plastic veggie tote on week 2. We’ll sub it out with a fresh one. Simply leave it in your car wherever you want the next bin to be placed by our team.
- Please return any Weber Ranch egg cartons. Due to COVID, Webers had trouble sourcing their usual cardboard egg carton source. So they had to use a different egg carton supplier this year, and the supply is really limited. They are trying to reuse and sanitize the plastic containers as much as they can.
- We WILL be having CSA pickup next Saturday, July 4th, at the Toledo Farmer’s market. If you need to switch your pickup site to another site due to the holidays, please let us know 48 hours before your desired pickup site.
- Watch our weekly Live Unboxing video this Tuesday around 8 PM inside the private Facebook group. Cadie Jardin, our CSA coach and dietitian, will show you what’s in the box, share storage tips and ideas for how to use your product. You can find the Facebook group at this link.
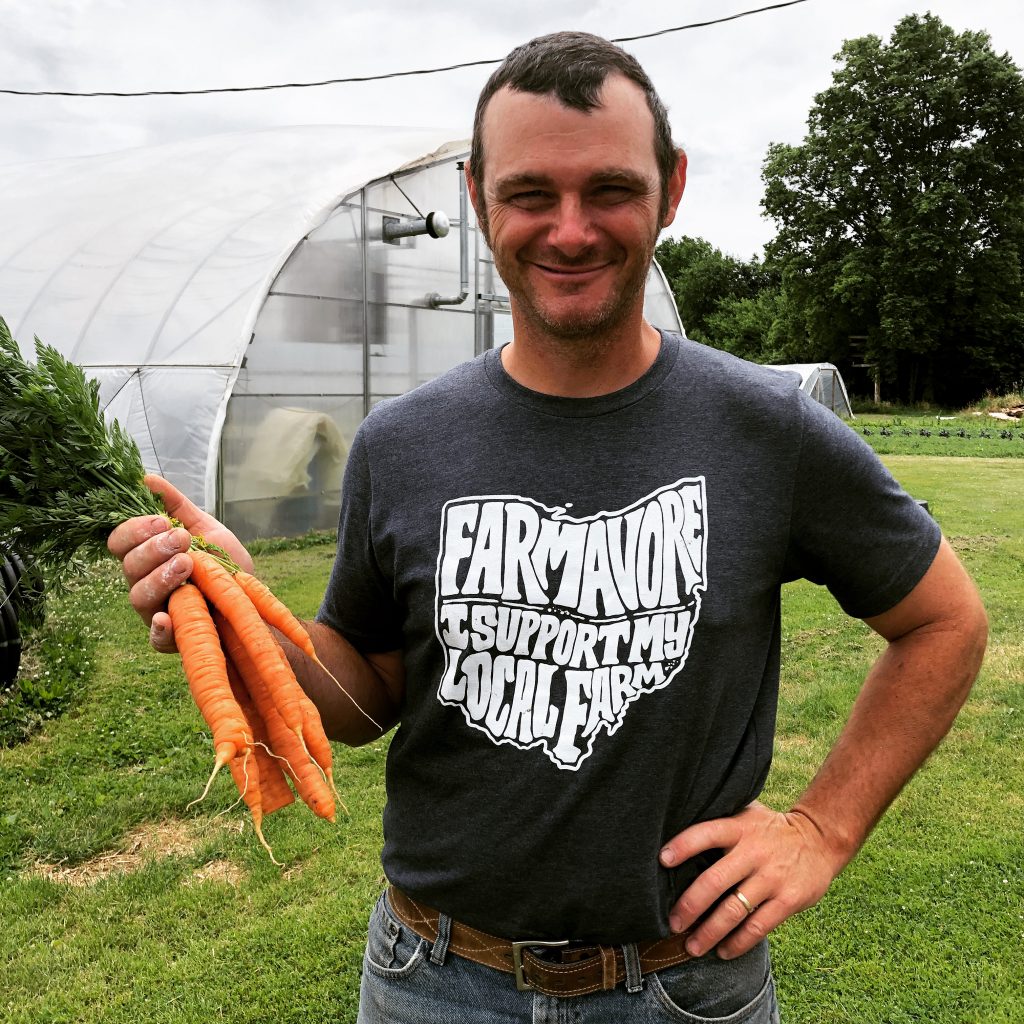
- I’m going to order more farm T-shirts. Do you want one? You can see the design on Farmer Kurt at the top of this blogpost. It would help if you reserved your color and size with me. Just email me at slfarms2@gmail.com and tell me what COLOR (green, blue, or pink) and size.
- New pickup flow for Toledo Customers. Watch this 40 second video where Jen shows you how to do it!
- Do you still have the Knueven Bonus coupon from last fall for a free half gallon of milk or pint ice cream? To redeem the coupon, go to www.Knuevercreamery.com/market to place your online store order. If you choose a half gallon of milk or the pint of ice cream, use the coupon codes we shared in the email to get it for free. If you don’t remember the coupon codes, email me at slfarms2@gmail.com. Enter the CSA pickup site for your location. Pick it up the next week at the Knueven station at your site. Feel free to order dairy items all summer long from their online store. They will be at our drop off sites every week.
- You can order additional items from the Shared Legacy Farms online store. Our store link is super easy to remember: www.sharedlegacyfarms.com/store ==> grab a DIY microgreen kit, honey, syrup, and bonus veggie items (like an extra bunch of lettuce or carrots that what’s already in your box). Just be sure to select the right pickup site that coincides with your pickup location. If the pickup option is greyed out or not available, it means you missed the window to order. You need to place your order 2 days before your site. I reload the store and set new pickup dates on Sunday afternoon.
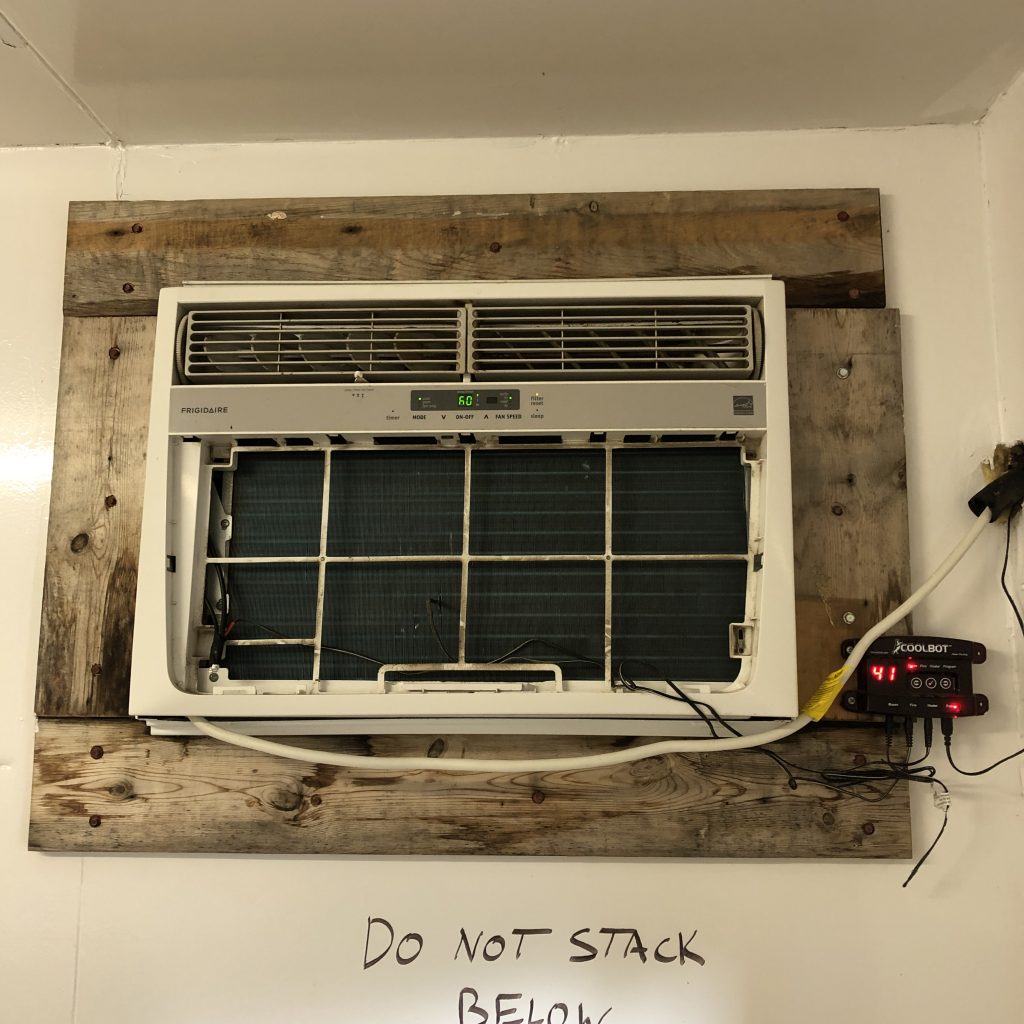
You can see the Cool Bot unit on the bottom right of the window air conditioner.
CoolBot: a Farmer Cooler Hack
Our CSA produce is stored each week in a walk-in cooler that is powered by a unique piece of technology called the “Cool Bot.” A farmer named Ron Khosla invented the Cool Bot in 2006 after being frustrated by the high cost of a walk-in cooler and condenser (about $3500).
He believed there had to be a way to use a regular window air conditioner unit to cool a room.
Here’s the problem: regular AC units won’t go below 60 degrees (or they freeze up).
Ron invented the Cool Bot which is a 4-inch micro-processor that attaches to the air conditioner unit, and somehow “tricks” it into dipping to temperatures as low as 32 degrees!
The result?
A nicely cooled space that saves farmers lots of money on equipment. A CoolBot costs about $350. Add to that the price of a window AC unit (around $500). The installation is easy, and we pay about $75 per month for electricity. Compare this to a five-figure condenser unit (plus pricey repair costs), and it’s a no-brainer.
Many farmers around the country now use CoolBot to cool their small coolers. You can read more about Cool Bot online at storeitcold.com.
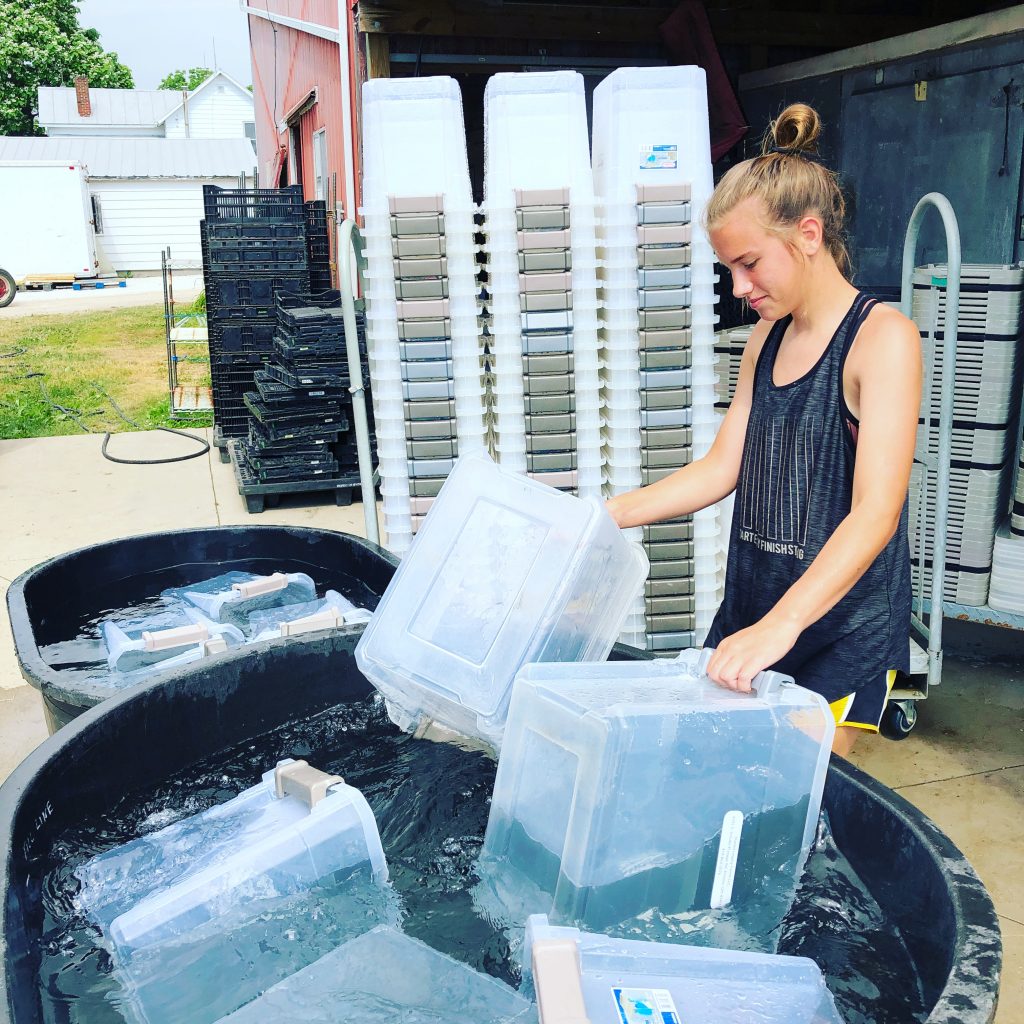
Molly is one of our bin washers. Each week, we sanitize your former bin to make sure we follow food safety guidelines.
WEEK 2 CSA RECIPES
Members: You can download these recipes as a PDF inside the Membership Academy.If you aren’t a member of this year, email Corinna at slfarms2@gmail.com — your entry is free as a CSA member.
Steak Tacos with Cilantro Radish Salsa
Adapted from Bon Appetit (www.bonappetit.com) | Total Time ~20 minutes
Love the idea of combining radishes into a salsa! Gives those tacos the perfect crunch!
Ingredients:
2 Tbs oil, divided
1 pound skirt or flank steak
Kosher salt and freshly ground black pepper
½ cup fresh cilantro leaves with tender stems, divided
4 radishes, trimmed, chopped
2 spring onions or 4 scallions, white and pale-green parts only, thinly sliced
½ serrano chile or jalapeño, seeds removed if desired, finely chopped
2 Tbs fresh lime juice
8 corn tortillas, warmed
2 oz queso fresco or Cotija cheese, crumbled
Directions:
Heat 1 Tbs oil in a large skillet over high heat. Season steak with salt and pepper and cook about 5 minutes per side for medium-rare. Let steak rest 5 minutes.
Meanwhile, chop half of cilantro and toss with radishes, onions, chile, lime juice, and remaining 1 Tbsp. oil in a medium bowl. Season radish salsa with salt and pepper.
Slice steak and serve on tortillas topped with radish salsa, queso fresco, and remaining cilantro.
Sunshine Salad Dressing
Adapted from Cookie and Kate (www.cookieandkate.com)
Total time ~10 minutes | Yields 1 ½ cups
Creamy and light, a great salad dressing made with Greek yogurt!
Ingredients:
½ cup plain Greek yogurt (any % fat will do)
¼ cup EVOO
¼ cup Dijon mustard
3-4 Tbs honey, to taste
2 Tbs lemon juice
2 Tbs apple cider vinegar, or more lemon juice
1 clove garlic, pressed or minced
½ tsp salt
fresh pepper
Directions:
In a 2-cup liquid measuring cup or bowl, combine all of the ingredients as listed. Whisk until blended. Taste, and season with additional pepper if necessary.
This dressing is intentionally bold, but if it tastes too tart for your liking, whisk in another tablespoon of honey.
Store leftover salad dressing in the refrigerator, covered, for 10 to 14 days.
Roasted & Raw Carrot Salad with Avocado
Adapted from Cookie and Kate (www.cookieandkate.com)
Prep time 20 minutes; Cook time 30 minutes | Serves 4
Roasted and raw carrots all in one salad? What a great idea for crack carrots!
Ingredients:
2 pounds carrots, divided
1-2 Tbs EVOO
Salt
1 large or 2 small avocado
4 Tbs Sunshine Salad Dressing (see below)
1/3 cup chopped green onion
1/3 cup torn fresh leafy herbs (basil, mint, dill and/or cilantro)
Pinch of red pepper flakes
Pepper to taste
Directions:
Preheat the oven to 425 degrees and line a large, rimmed baking sheet with parchment paper for easy cleanup.
To prepare the carrots: First, wash all the carrots. Then, reserve 3 large carrots and set them aside. Slice the remaining carrots on the diagonal into pieces about ½″ thick and 1 ½″ long. On the baking sheet, toss the carrot pieces with enough olive oil to lightly coat them. Arrange them in a single layer and sprinkle them lightly with salt.
Bake for 25 to 30 minutes, tossing halfway, until the carrots are tender and turning deeply golden on the edges.
Meanwhile, slice the remaining 3 carrots into very thin rounds (about as thin as you possibly can; you should have about 1+ cup sliced). Place the carrot rounds in a bowl, and fill the rest of the bowl with cold water and a handful of ice cubes (this will make the carrots nice and crisp). Set the bowl aside.
When the carrots are done roasting, arrange them across a large platter. Drain the carrot rounds well, and sprinkle them all over the roasted carrots.
Halve the avocado(s) and remove the pit(s). Thinly slice half of the avocado and carefully scoop out the pieces with a large spoon. Arrange the slices in sections over the salad. Dice the rest of the avocado, scoop out the pieces and arrange them all over the salad.
Drizzle the salad dressing lightly all over the salad by the tablespoon, then sprinkle the green onion and leafy herbs on top. Finish by sprinkle the salt, red pepper flakes (if using) and a few twists of black pepper on top. Serve promptly, as the avocado will brown over time.
French Carrot Salad
Adapted from Cookie and Kate (www.cookieandkate.com)
Total Time ~20-30 minutes
This is a wonderful way to enjoy those carrots, and tastes better after a few days of marinating. Kind of like a carrot-slaw type salad.
Ingredients:
Carrot Salad
1 pound carrots
2 Tbs chives or green onions, finely chopped
2 Tbs fresh parsley, finely chopped
Optional: 1 can (15 ounces) chickpeas, rinsed and drained, or 1 ½ cups cooked chickpeas
Dressing:
2 Tbs EVOO
2 Tbs lemon juice
2 tsp honey
1 tsp Dijon mustard
½ tsp ground cumin
¼ tsp fine sea salt
Directions:
To prepare the carrots: You can grate them on the large holes of a box grater, or use short strokes with a julienne peeler, or process them in a food processor fitted with a grating attachment. You’ll end up with about 3 cups grated carrots.
Place the carrots in a medium serving bowl. Add the chives, parsley and optional chickpeas to the bowl.
To make the dressing, whisk all of the ingredients together in a small bowl until completely blended.
Pour the dressing over the carrot mixture and stir until the mixture is evenly coated in dressing. For best flavor, allow the salad to marinate for 20 minutes before serving. Toss again before serving. This salad keeps well in the refrigerator, covered, for about 4 days.
Zucchini Noodles with Garlic Scape Pesto, Peas & Mint
Adapted from Bloglovin (www.frame.bloglovin.com)
Total time ~20 minutes | Serves 4
If you have a spiralizer, then zoodles are a great way to get in more veggies! A light, healthy substitute for pasta, especially when you add in some garlic scapes!
Ingredients:
For the Pesto-
10 garlic scapes, diced
1/3 cup raw walnuts
1/3 cup EVOO
1 Tbs lemon juice
½ tsp fine salt & pepper
For the Zucchini Noodles-
4 medium zucchini, ends trimmed
2 cups English peas, blanched (can also use frozen peas)
1/3 cup pine nuts
1/3 cup fresh mint leaves, minced
½ tsp crushed red pepper flakes
1 Tbs EVOO
salt and pepper to taste
Directions:
Prepare the pesto by adding all of the ingredients except the oil to a food processor. With the motor running slowly add the olive oil. Process until smooth. Taste test and adjust seasonings if necessary.
If the pesto is too thick add a little more oil or a few tablespoons of water. Set aside.
If you’re using fresh peas blanch them in boiling water until bright green and tender. If your using frozen peas thaw and blanch if necessary.
Use a julienne peeler, spirilizer, or mandoline to slice the zucchini into noodles. Place zucchini noodles in a large bowl.
Toss with pesto, peas, mint, pine nuts, crushed red pepper flakes, salt and pepper. Drizzle with a tablespoon more of olive oil and serve.
Baked Cheesy Zucchini Bites
Adapted from Mel’s Kitchen Café (www.melskitchencafe.com)
Total time 30 minutes | Makes 1-2 dozen bites
I made these this winter with my FROZEN shredded zucchini and it was perfect! Kids loved them! All at the suggestion of a CSA member!
Ingredients:
1 ½ cups packed shredded zucchini (no need to peel zucchini)
1 large egg, lightly beaten
¼ to ½ cup shredded sharp cheddar cheese or a blend of cheddar and Monterey jack
¼ cup panko or regular bread crumbs
¼ tsp dried basil (or 1-2 teaspoons fresh)
¼ tsp garlic powder
¼ tsp salt
1/8 tsp pepper
Directions:
Preheat the oven to 425 degrees F. Line a rimmed baking sheet with parchment paper and lightly coat with cooking spray or lightly grease an unlined baking sheet.
Place the shredded zucchini in a clean kitchen towel and wring out all the excess water over the sink until the zucchini is really dry. You should have a little over 1 cup after squeezing out the water (if you have a scale, you’ll want about 6 ounces of zucchini that’s been squeezed dry).
Place the zucchini and remaining ingredients in a medium bowl and mix until combined.
Drop the mixture by tablespoonfuls on the prepared baking sheet and lightly press the mounds with your hands to flatten slightly.
Bake for 16-20 minutes until the edges are golden. Serve.
Carrot Top Hummus
Adapted from Rachel, Teacher-Chef (www.teacher-chef.com)
Makes 2 Cups | Total time 10 minutes | Freezer Friendly (1-2 months)
Such a healthy dip to go with other veggies!
Ingredients:
1 bunch carrot tops (approximately 2 cups packed)
1 clove garlic (or more, to taste)
2 Tbs lemon juice
1 can chick peas
1 tsp salt
1 tsp cumin
¼ tsp pepper
Olive Oil
Directions:
Clean your carrot tops & chop off any extra stem parts that don’t have leaves attached to them. Add to the bowl of your food processor with your garlic, salt, & lemon juice. Process until pieces have been mostly broken down.
Add in your (drained – but reserve the liquid in case you need it) can of chick peas and your cumin & pepper.
Process until smooth.
Add in some Olive Oil (up to a tablespoon) and/or some reserved liquid from your chick peas if needed.
Continue to run your food processor until smooth. Taste and add any seasonings as needed.
Place into a bowl and serve or refrigerate. As it sits, the flavors will continue to meld and become even more delicious – but this is also perfect to serve right away and is good in the refrigerator for at least a week!
Carrot Salad with Green Onions
Adapted from Epicurious (www.epicurious.com) | Serves 8
This one is well worth getting your food processor out for! Better made a day ahead to let everything marinate. It makes a lot, so adjust as needed.
Ingredients:
2 pounds carrots, peeled, coarsely grated (about 7 cups)
6 green onions, chopped
3 Tbs fresh parsley, minced
3 Tbs white wine vinegar
1 Tbs grated lemon peel
2 tsp Dijon mustard
½ cup EVOO
8 whole red cabbage leaves
Directions:
Mix carrots, green onions and parsley in large bowl to blend.
Whisk vinegar, lemon peel and mustard in small bowl to blend. Gradually whisk in oil. Season to taste with salt and pepper. Pour dressing over carrot mixture. Toss to coat evenly.
Cover and refrigerate at least 2 hours.
Spoon salad into cabbage leaves; arrange on platter and serve.
Pickled Scallions
Adapted from Bon Appetite (www.bonappetite.com) | Makes 1 pint
Use anywhere you would use a pickled onion! Sandwiches, salads, as a condiment!
Ingredients:
1 bunch scallions
2 tsp mustard seeds
1 tsp coriander seeds
½ tsp cumin seeds
1 cup white wine vinegar
½ cup sugar
1 Tbs kosher salt
Directions:
Trim both ends of scallions and cut in half crosswise. Pack into a 1-pint heatproof jar.
Toast mustard, coriander, and cumin seeds in a dry small saucepan over medium-low heat, tossing often, until fragrant, about 2 minutes. Add to jar.
Bring vinegar, sugar, and salt to a simmer in same saucepan over medium heat, stirring to dissolve sugar and salt. Pour brine over scallions and seal jar. Chill at least 1 day before using.
Cilantro Lime Dressing
Adapted from Fifteen Spatulas (www.fifteenspatulas.com) | Makes 1 ½ cups
Use this as a dressing or as a dip for other veggies!
Ingredients:
1 bunch cilantro (make sure it is dry after rinsing)
1 jalapeno
3 large cloves garlic minced (2 tbsp minced)
3 Tbs fresh lime juice
½ cup gGeek yogurt*
½ tsp salt
¼ tsp black pepper
6 Tbs EVOO
Directions:
If the ends of the cilantro stems look brown or old, trim them off, keeping as much of the stem as possible. The stems blend well and have great flavor.
Cut the stem off the jalapeno, and remove the seeds and ribs from the jalapeno if you desire. Keeping those in will make the dressing more spicy, and they will blend up just fine.
Place the cilantro, jalapeno, minced garlic, lime juice, yogurt, salt, and pepper into a blender, and blend until smooth, about 30 seconds.
Add the olive oil, and blend for a few seconds, until just incorporated.
Taste and make any necessary seasoning adjustments. Then enjoy!
Store leftovers in the refrigerator for up to 5 days.
Fresh Cherry Salsa
Adapted from Imperial Sugar (www.imperialsugar.com)
If you got the fruit share this week, try this with chips or all alone! I think it’s great without the added sugar, just add to taste if needed!
Ingredients:
2 ¼ cups pitted cherries (3/4 pound), roughly chopped
1 Tbs fine granulated sugar
¼ cup fresh lime juice (about 2 limes)
1 tsp red wine vinegar
1 tsp minced garlic (about 2 cloves)
¾ tsp kosher salt
¼ cup finely chopped red onion
2 fresh jalapeño peppers, seeded and finely chopped
¼ cup chopped fresh cilantro
Directions:
In a large bowl, stir cherries together with the sugar and let stand 5 minutes for the sugar to absorb.
Stir in the lime juice, red wine vinegar, garlic, and salt. Gently fold in the red onion, jalapenos and cilantro.
Chill for 30 minutes to allow the flavors to meld, then serve cold or at room temperature.
Ginger Beer Cherry Vodka Soda
Adapted from Half Baked Harvest (www.halfbakedharvest.com)
I know this group loves their cocktails made with CSA ingredients!
Ingredients:
Cherry Simple Syrup:
1 cup fresh cherries, pitted
2-3 Tbs honey
Ginger Beer Cherry Vodka Soda:
Crushed Ice
¾ cup ginger beer
2-4 Tbs cherry simple syrup depending on your taste, abovev
1-2 ounces vodka
1 Tbs lime juice
Fresh cherries for garnish
Directions:
Cherry Simple Syrup
In a small to medium size pot, combine the cherries and honey. Use a muddler or just a fork to mash the cherries up until they are almost pulp like. Add 1 cup water and place the pot over high heat. Bring to a boil, stirring often for about 5 minutes. Remove from the heat. Strain the mixture through a fine mesh strainer. Chill until completely cool, about 30 minutes. Syrup can be kept in the fridge for at least one week.
Ginger Beer Cherry Vodka Soda
Fill your glass with ice. Add the ginger beer, cherry simple syrup, vodka and lime juice. Stir to combine. Garnish with fresh cherries and thyme. DRINK.
Garlic Scape Butter with Herbs
Adapted from Binky’s Culinary Carnival (www.binkysculinarycarnival.com)
Total Time ~10 minutes
In case you still have some scapes from last week, this is a great way to preserve some scapes and HERBS! Save this one for later when your potted herbs are thriving, adjust measurements as needed.
Ingredients:
1 lb unsalted butter, softened to room temperature
½ cup garlic scapes, chopped
2 Tbs fresh parsley, chopped
1 Tbs fresh basil, chopped
1 splash EVOO
Directions:
Chop garlic scapes roughly in food processer or with knife, chop herbs as well.
Soften garlic in olive oil over medium low heat, watching carefully. Scapes should just soften, not brown. Once soft, allow to cool to room temperature.
Add butter, garlic and herbs together. Mix well. Wrap in wax paper or plastic wrap. Cool in refrigerator or store in freezer to prolong shelf life.
Simple Rhubarb Sauce
Adapted from www.TasteofHome.com
Total Time ~ 20 minutes | Makes 1 ¼ cups
Farmer Kurt makes this every year at least once. It’s probably the easiest way to use rhubarb. Rhubarb can be frozen! Simply chop it up and throw it in a Ziplock bag.
Ingredients:
1/4 cup brown sugar
1/4 cup water
2-1/4 cups sliced fresh or frozen rhubarb
1 teaspoon grated lemon zest
1/8 teaspoon ground nutmeg
Directions:
In a small saucepan, bring sugar and water to a boil. Add rhubarb; cook and stir until rhubarb is tender and mixture is slightly thickened, 5-10 minutes. Remove from the heat; stir in lemon zest and nutmeg.
Serve warm or chilled over pound cake, pancakes, or ice cream. Refrigerate or freeze leftovers.
Strawberry Rhubarb Cobbler with Honey Butter Biscuits
Adapted from Half Baked Harvest (www.halfbakedharvest.com)
Total time ~50 minutes | Makes 8 servings
Try this for a weekend treat, or freeze that rhubarb and make this in the fall! These include a recipe for homemade biscuits, but you could use premade if you needed to.
Ingredients:
3 cups fresh or frozen strawberries halved or quartered
2 cups diced rhubarb about 2 stalks
½ cup coconut sugar may sub brown sugar or granulated sugar
zest of 1 lemon
2 tsp vanilla
Tsp pinch of sea salt about 1/4
¼ cup honey
2 Tbs salted butter melted
whipped cream for serving
Biscuits:
2 cups all purpose flour
1 ½ tsp baking powder
8 Tbs cold salted butted cubed, or unsalted with a pinch of salt
½ cup buttermilk
¼ cup honey
coarse sugar for sprinkling (optional)
Directions:
Preheat the oven to 375 degrees F. Lightly rub a 10-12 inch cast iron skillet (or large pie plate) with a little softened butter or cooking spray.
In the skillet, combine the strawberries, rhubarb, coconut sugar, lemon zest, vanilla and a pinch of sea salt. Toss well to combine.
In a large bowl, combine flour and baking powder. Whisk until combined. Using a fork, pastry blender or your hands, add butter pieces to the flour and mix until coarse little crumbles remain. Whisk together the buttermilk and honey and pour into the flour. Stir with a spoon until just combined, trying not to over mix. Use your hands if needed to bring the dough together.
Use a 1/4 cup measure to drop batter onto the cobbler or press dough out on a sheet of parchment paper or cutting board, and then use a biscuit cutter to shape the dough into rounds. Place the rounds on top of the cobbler. Sprinkle the biscuits with coarse sugar.
Bake the cobbler for 35-40 minutes or until the strawberries are bubbling and the biscuits lightly golden.
In a bowl, stir together the honey with the melted butter.
Serve the cobbler warm with whipped cream and a drizzle of the honey butter. EAT!
Simple Rhubarb Crisp
Adapted from Pinch of Yum (www.pinchofyum.com)
Total time ~30 minutes | Makes 6-8 servings
This is one of the classic ways to enjoy rhubarb each summer. This recipe is little lower in sugar than others!
Ingredients:
For the filling:
2 cups rhubarb, diced
2 cups strawberries, diced
zest from one orange (or lemon)
1 tsp lemon juice
5 Tbs honey
a pinch of salt
1 ½ Tbs arrowroot powder*
For the crumbles:
½ cup chopped pecans
¾ cups almond flour
2 Tbs coconut flour
1 tsp cinnamon
¼ tsp salt
¼ cup honey
4 Tbs coconut oil or butter
Directions:
Preheat the oven to 350 degrees. Put the strawberries and rhubarb in a large mixing bowl with the orange zest, lemon juice, honey, salt, and arrowroot powder and mix well.
Mix the pecans, flours, cinnamon, salt and honey together in a medium mixing bowl. Cut in the coconut oil with your hands or a pastry cutter until the mixture begins to form crumbs.
Grease an oven proof casserole or skillet and spoon in the fruit filling. Crumble the topping evenly over the top. Bake for 25 minutes, checking occasionally. When the topping is browned and the fruit is bubbling, remove from oven and allow to cool for a few minutes before serving.
Pickled Garlic Scapes
Adapted from The Spruce Eats (www.thespruceeats.com)
Total Time ~25 minutes
Makes 1 pint
Still have scapes from last week?… This is a quick pickle recipe that you can store in the fridge! Enjoy on sandwiches, salads, burgers or just for snacking! Good in your fridge for up to 6 months!
Ingredients:
15 garlic scapes
Optional: 1 dried chili
1 cup cider vinegar
4 tsp fine sea salt
4 tsp sugar
Directions:
Trim the garlic scapes, curl them up, and place them in a pint jar with a tight-fitting lid. We like to truly stack them on top of one another to make them pretty, and then fill in the center space with more tightly curled scapes, but you can also cut the scapes into bite-size pieces and then just pile them in. Tuck the chili inside if you are using it. Bring the vinegar, salt, and sugar with 1 cup of water to a simmer.
Cook, swirling the pan if necessary until the salt and sugar are fully dissolved. Pour the warm vinegar mixture over the garlic scapes in the jars to cover them (you may not use all of the vinegar mixture), but leaving about 1/2 inch of headspace at the top (between the top of the liquid and where the lid will be). Screw the lid on the jar. Let it sit until cool, then store it in the refrigerator for at least 4 weeks and up to 6 months to let the flavors blend and the garlic scapes to “pickle.” The pickles will get more tender over time, but their flavor will stay garlicky strong.