
What I Didn’t Know About Grilling Vegetables
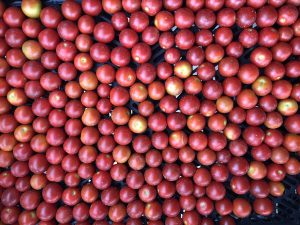
Cherry tomatoes are great on the grill, but put them on a skewer and cook over high heat right over the flame.
Don’t laugh.
I really don’t know much about grilling — be it meat or veggies. I traditionally leave that department to my husband.
I have always found grilling to be intimidating, overwhelming, and just downright confusing.
- Like how do you get those charcoal bricks to light?
- And how much do you need to pile up on the grill?
- How long will it last?
- How long do you wait before you can start cooking over them?
- Where do you put the food so it doesn’t burn? But still cooks INSIDE the food?
- Do you keep the lid on or off?
- And what’s with all the vents?
And let’s be frank… people say, “It’s so fast and easy…”
But when I come in from a long day and I have no plan for dinner, the thought of taking 20 minutes to wait for Kurt to get over to the house to start the grill, and ANOTHER 20 minutes for the briquettes to “be ready” just feels too long.
No thanks. I’ll just make some fried eggs… again.
Can I have an AMEN?
I have a feeling that there are at least a FEW of you out there who may feel the way I do about grills.
Skeptical and wary.
And so this topic has been noticeably silent in our CSA “training” library. I just wasn’t qualified to teach it. Yet, I KNOW that some of our CSA members are grill-junkies.
I see your pictures in the Facebook group. And it makes me wonder: “What am I missing?”
So this past week, I asked one of our CSA master members Brian Hammer — a true grilling expert — to help me. I asked him, “Will you teach me how to grill like you?” So I was invited to Waterville, where I got my own private grilling tutorial in Brian and Tara’s backyard.
And boy, was it good.
(I felt like I was hanging out with Rick Bayless, actually).
Lucky for you, I captured it on film, and put this new Grilling 101 training inside the Academy for CSA and Academy members to access at any time.
To learn how to join the Academy and access all our veggie video tutorials, go here.
I think it’s going to be a community favorite.
In this blogpost, I thought I would share with you my big “a-ha” moments that clarified some questions I’ve had my whole life.
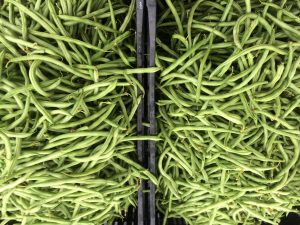
Green beans should be cooked in a grill pan. Brian taught me how to make your own grill pan using a disposable aluminum tray, and it worked great!
For some of you, these observations will seem like amateur tips. But for a clueless grill-avoider like me, these may just be the ticket to help you get over your misgivings of the grill and give it a shot.
A-Ha Moment #1
A charcoal chimney + deep fryer burner shortens the heat-prep time to around 10 minutes.
My biggest obstacle to embracing the charcoal grill has been that it just takes too long to get ready. Who has time to wait 20-30 minutes just to preheat a grill?
Brian has a deep fryer burner connected to a propane stove. With one click of the firestarter he had this thing flaming. Then he placed his charcoal chimney starter (filled with briquettes) right on top of it for about 30 seconds. The chimney was aflame and only had to cook for about 5 minutes before we could dump it into the grill pit.
Major time saver. I’m pretty sure that if I’m going to embrace the grill, I’ll want to get that kick-starter stove. Shoot, maybe Kurt even has one.
Bottom line: getting the grill preheated doesn’t have to take so long. With the right equipment, I can have my oven preheated in 10 minutes.
A-Ha Moment #2
Create a “Three-Zone” fire by placing the charcoal on one third of the grill.
Now I understand how to create different heat levels on a grill. Where I put my veggies will depend on what heat level they need.
Corn and tomatoes go right over the hot coals. Things that need a low and slow burn like onions might go more in the middle.
Food that needs to stay warm goes in the section furthest from the coals. This method will give me more heat settings besides just “char and burn.”
A-Ha Moment #3
There’s a lever under the charcoal grill that actually does something important.
Yup. Laugh it up. But I had no idea there was a lever under the grill. This lever has three settings (left, middle, right), and depending own how you move it, you open the vents to allow more or less oxygen into the grill.
More oxygen means hotter fire.
So in most cases, Brian recommended having the vent open all the way to allow the temperature to build inside the grill.
A-Ha Moment #4
Clean the grill with the grill brush after it’s heated up.
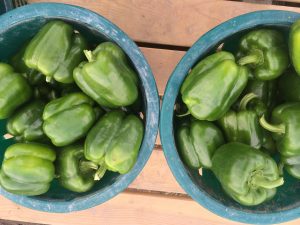
Peppers are a great veggie to roast on the grill.
I know. This seems obvious. But it wasn’t for me. Grill rookies like me need to be hand-held through very obvious steps like this one. I thought you had to scrub those grates off with warm soapy water.
But no… you just heat the grate so the stuff burns off a bit, then scrub it with the grill brush.
Sign me up.
A-Ha Moment #5
Keep the grill lid off when you want really hot temps.
So this was NOT intuitive for me. My logical brain wants to tell me to put a lid on it to super-charge the temps inside the grill.
And although sometimes you want to cover the grill to trap heat to cook low and slow, if you’re cooking veggies over direct flame, and you really want it to get HOT, you keep the vent open below and the lid off the top. This allows for FULL oxygen to flow and make a rip-roaring hot fire.
Brian used this method to cook our green beans in a grill pan, the corn on the cob, and the cherry tomatoes on a skewer.
A-Ha Moment #6
Oil the grate with a paper towel.
Rick Bayless does this a lot in his cooking videos, but I finally understood why.
Oil is pretty much a staple ingredient when it comes to prepping veggies for the grill. But the oil will drip right off skewered veggies like tomatoes.
Solution: put oil right on the grates using an oil-soaked paper towel, applied with a set of grill tongs.
A-Ha Moment #7
I can make my own grill pan.
Grill pans are helpful for holding things like green beans or a vegetable medley, that you don’t want falling into the grill grates.
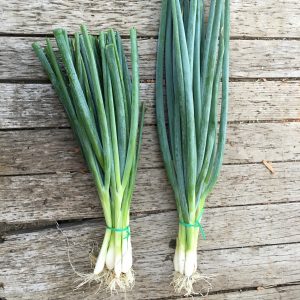
My favorite item we grilled was the green onion. It was delicious with some olive oil and salt, grilled over high heat. I could have eaten 5 of these.
Save some money and make your own using a disposable aluminum pan. Just poke some holes in the bottom, and you’re all set. Figure out the ideal size you like (and shape) before you invest in an expensive grill pan.
“My Life-Changing Foodie Moment This Year”
The best part about this tutorial for me was that it clarified and simplified the grilling process. I now know the step by step process for cooking veggies on the grill.
And I’m not confused anymore. In fact, I feel empowered to do it myself for the first time in my life. And that’s a pretty big deal.
Farmer Kurt… get out of the way. Cuz once I get that propane hot fryer burner… it’s green lights go.
I consider this training to be “the” life-changing foodie moment for me so far this season. Thanks, Brian, for showing me how simple grilling can be, and for sharing it with our CSA/Academy community.
DOWNLOAD THE GRILLING EQUIPMENT GUIDE
Confused by all the gear you need to really get started with grilling veggies?
So was I.
That’s why I decided to make a cheatsheet after my training with Brian to clarify it all for you.
It’s a FREE resource called the “Veggie Grilling Tools Guide.” Download it and use the Amazon affiliate links inside this PDF as a guide to help you find the product right for you. (I do get a small commission if you use my link. Thank you!)