
Beginner Canning Equipment Checklist
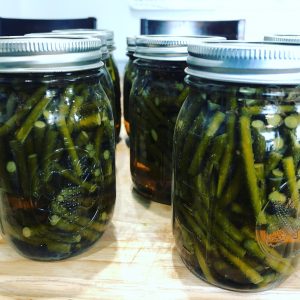
I pickled these garlic scapes using a water bath canner.
Does canning freak you out?
Yes, I’m talking about that big water bath canner, the jars of fruit preserves and dilly beans you ate at your grandma’s house…
I remember when I first married Kurt, all my newly acquired relatives were canning everything.
(I’ll be honest, there was a little social pressure to join the club and master this skill set.)
I still can picture my father-in-law stepping into a giant crock of cabbage lined with a garbage bag and “stomping” on a batch of sauerkraut.
I also remember my new Grandma Hill showing me how to make a simple syrup for canned peaches. (This was a pretty precious bonding moment for me).
And I got some quality time with my new mother-in-law, as she taught me how to skin tomatoes by scalding them in hot water first, and shared stories of my husband Kurt. (Then she showed me her scary pressure canner!)
Had I not had these guides to help me get started, I probably would never have given this a chance.
Here were just some of the thoughts running through my brain in the early days.
- I was afraid I’d poison my family. Botulism and mold… how risky was this anyway?
- I had no idea where to even start. Overwhelmed by all the do’s and don’ts, I wasn’t sure what to focus on first.
- I didn’t know what recipe to use. Were they all safe?
- I didn’t know what equipment I needed. Visions of exploding cookers were dancing in my head.
Sound familiar? These are all normal fears of the first-time canner.
Lucky for me, I had a host of family who’d been doing it forever, who could show me the ropes.
Canning is actually best done (and learned) with friends or family who know what they’re doing. Not only does this make you feel more confident that you aren’t inadvertently concocting something that will give your family a major case of food poisoning, but many hands make light labor. You can jibber-jabber about all kinds of family gossip, which makes the time go by faster.
And it’s fun.
So for all you folks who WANT to start canning, but you’re scared (like I was), I’m creating this blogpost for YOU.
Your first step is getting the right equipment.

You can download this illustrated canning equipment checklist below. It includes my recommended links to Amazon.
I recommend you start with the basic water bath canner set-up as a beginner.
Water bath canners are giant pots filled with water that sit on a regular stove top. You put the filled jars of product in this pot and bring the water to a boil for a certain amount of time. This kills off the dangerous micro-organisms inside the jar. And the vacuum seal that forms after you remove the jars removes the air from the jar (which takes care of the germs that might be hanging out in the air).
Water bath canners are used for fruits and high-acid items – not for vegetables. This is because fruits have a high natural pH, which keeps those bad micro-organisms from forming. It’s also used for tomatoes (which naturally have a high pH) and pickling.
Side note: Once you’re more advanced, you can learn how to use a “pressure canner.” Pressure canners are used for low pH veggies because the super-heated interior of the pressure cooking can get the temperatures to a much higher threshold to kill off the bacteria that may be present in the produce.
I always advise beginners to start with the water bath canner to get their feet wet… then graduate to the pressure canner after they get some confidence.
So here’s the basic set-up for a beginner canner. You’ll need the following:
A Water Bath Canner is the tool of choice for processing high-acid foods like tomatoes, fruit spreads, pickles, sauerkraut, or fruit juice. It’s around $20 dollars, and looks like a giant black pot. It comes with a rack inside that holds the jars. If you have the funds, consider getting an electric water bath canner instead that connects to an outlet and frees up some stovetop space. I use the electric one now exclusively.
Mason Jars are the vessel of choice for preserving foods using either the water-bath or pressure-canning method. They come in a variety of sizes. It all depends on how much you’ll use in your recipe. For example, most jams are done using half pints. Tomatoes could be canned in quarts or pints. Jars can be reused again and again, so consider them an investment. Buy the wide-mouth jars, not the regular mouth if you can.
Lids and Bands (Rings): Lids are the circular disks with a sealing compound around the edge. They can only be used once. You’ll be buying new lid packs every year. Screw bands are screwed on the jar after the lid is placed. They can be reused again and again, but be sure to discard rusty ones over time. They come in two sizes — wide mouth or regular mouth. Be sure you get the right ones to match your jars.
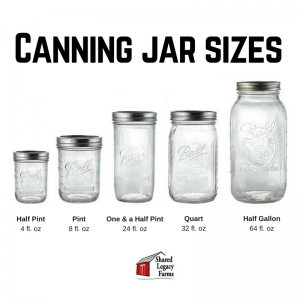
Canning jars come in lots of different sizes. Choose the wide mouth jars if you can.
Small pot: You’ll put your lids into this and bring it to a simmer. You always must use hot lids.
Jar Lifter: This must-have tool helps you safely remove jars from the canner. Your hands grip the rolling cylinder side, and the rubbery end grips the hot jars.
Canning Funnel: A metal or plastic funnel that fits into both regular or wide mouth jars to keep the product from spilling all over the place. Must-have tool.
Lid Wand: The magnetic tip on this tool helps you remove lids from the hot water bath. These are nice to have, but you could just use a fork if needed.
Knife: Use this remove air bubbles trapped in the filled jars before you seal them.
Lint-free cloth: You’ll use this to wipe the jars before you put the lids on them. I use an old sock!
Pectin: Use pectin in recipes for jam or jellies to help a gel set. Use either liquid or powder pectin, depending on the recipe. They are not interchangeable. There are also low-sugar pectins which I highly recommend. FYI: Never double the recipe when making jams, because the gel won’t set right if you do.
If you want to grab my Canning Equipment Checklist (with links to Amazon), subscribe here. This will give you the illustrated PDF guide, but also tag you as a canner wanna-be and (more importantly) set off an email sequence that will slowly teach you the basics of canning over the course of 2 weeks. I wrote this email training to help guide you through your questions and get you ready to start your first batch.
We also have a Canning Club section inside the SLFarms Membership Academy. I’m creating a video every time I can something this year, so you can watch me in action and copy it. There are already several step by step tutorials inside the Academy now.